S11-12 Vue-项目:mr-vue3-ts-consult-patient
[TOC]
环境搭建
接口文档
地址:https://apifox.com/apidoc/shared-aeb0d03e-c713-4f55-afaf-21cddf542751/api-160608919
技术栈
- Vue3:
@3.5.13 - TS5:
@5.6.3 - Vite6:
@6.0.5。使用create-vue创建项目 - Pinia2:
@2.3.0。 - VueRouter4:
@4.5.0 - Node20:
node@20.11.1 - Vant:
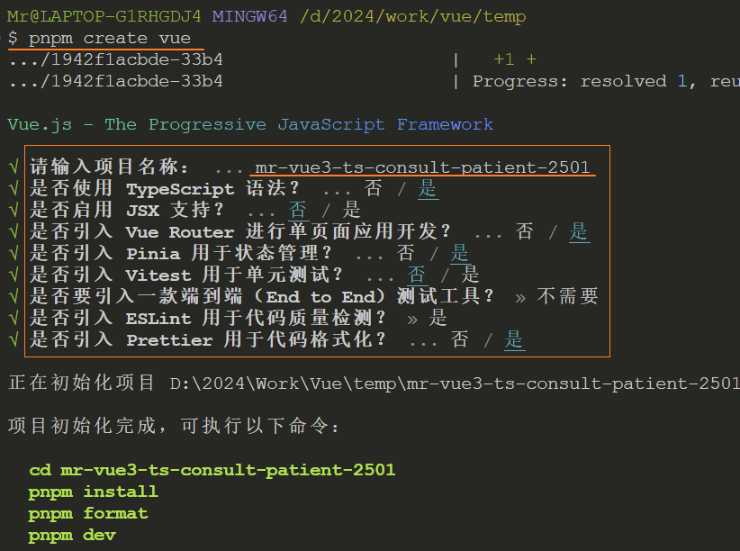
创建项目
使用create-vue 工具创建mr-vue3-ts-consult-patient项目。create-vue 是基于vite的脚手架工具
pnpm create vue@latest创建选项
项目配置
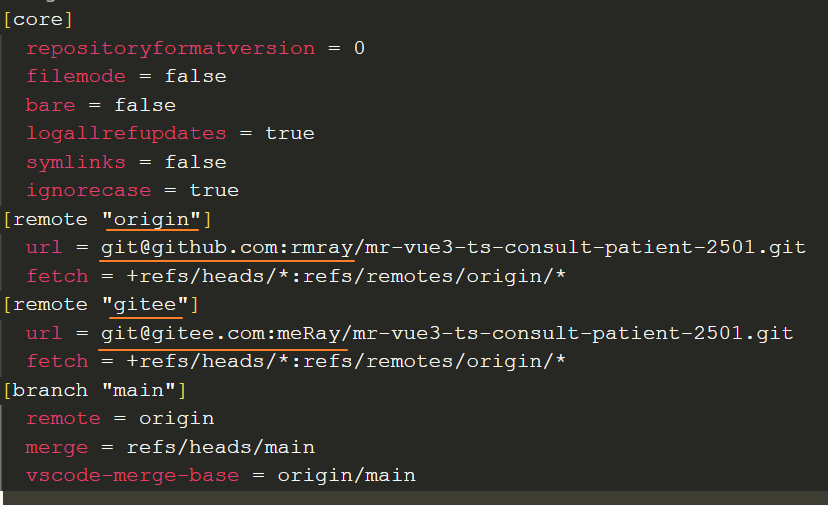
Git配置
Eslint配置
1、在.eslintrc.cjs中配置prettier代码风格
  rules: {
    'prettier/prettier': [
      'warn',
      {
        singleQuote: true,
        semi: false,
        printWidth: 80,
        trailingComma: 'none',
        endOfLine: 'auto'
      }
    ],
    // 💡 添加未定义变量错误提示,create-vue@3.6.3 关闭,这里加上是为了支持下一个章节演示。
    'no-undef': 'error'
}2、忽略vue组件多单词警告
  rules: {
    'vue/multi-word-component-names': [
      'warn',
      {
        ignores: ['index']
      }
    ],
}3、关闭props解构警告
  rules: {
    'vue/no-setup-props-destructure': ['off'],
}后面开启响应式语法糖就结构props就不会再丢失响应式。

Husky配置
1、初始化与安装
pnpm dlx husky-init && pnpm install2、修改 .husky/pre-commit 文件
pnpm lintlint-staged配置
1、安装
pnpm i lint-staged -D2、配置 package.json
{
  "scripts": {
    "lint-staged": "lint-staged"
  }
  "lint-staged": {
    "*.{js,ts,vue}": [
      "eslint --fix"
    ]
  }
}3、修改 .husky/pre-commit 文件
pnpm lint-staged目录结构
每一个目录结构的作用:
./src
├── assets        `静态资源,图片...`
├── components    `通用组件`
├── hook    `组合功能通用函数`
├── icon         `svg图标`
├── router        `路由`
│   └── index.ts
├── service      `接口服务API`
├── store        `状态仓库`
├── style        `样式`
│   └── main.scss
├── type         `TS类型`
├── utils         `工具函数`
├── views         `页面`
├── main.ts       `入口文件`
└──App.vue `根组件`集成-Vant
基本导入
1、安装 vant
pnpm i vant2、在main.ts中引入样式
import 'vant/lib/index.css'3、在组件中使用vant组件
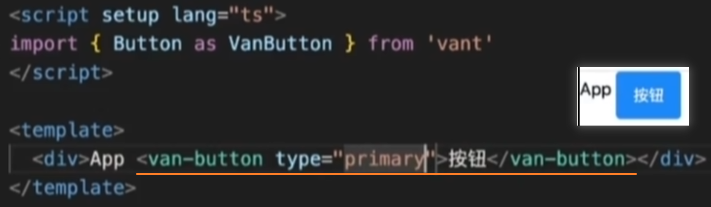
4、推荐按需引入
组件自动注册
已过时
替代方法:使用vant的按需导入
痛点:使用手动导入组件的方法过于繁琐,每次使用时都需要按以下方法手动导入。
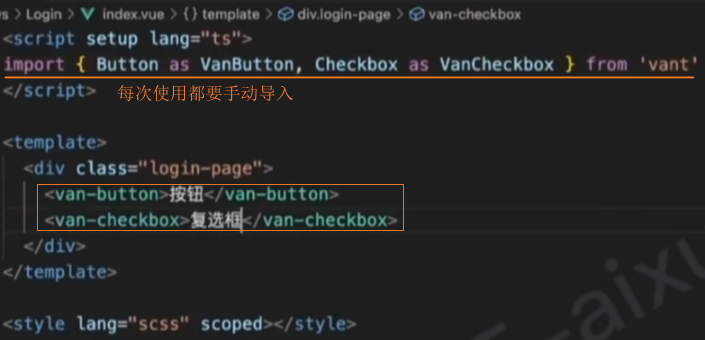
解决:使用 unplugin-vue-components 实现自动按需加载,和自动导入组件。
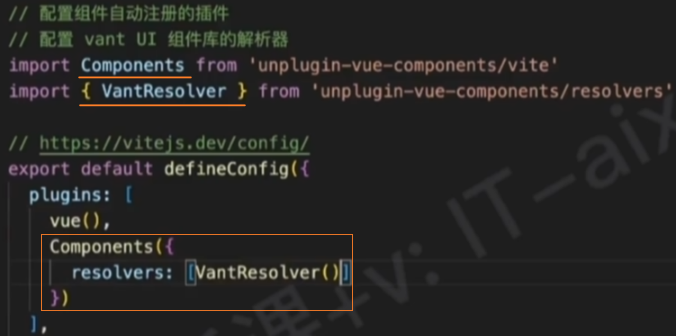
1、安装 unplugin-vue-components 插件
pnpm i unplugin-vue-components -D2、配置 vite.config.ts
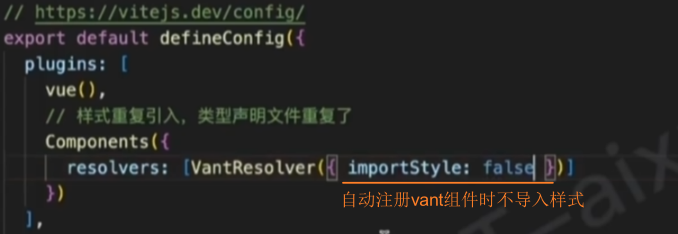
3、优化:样式重复的优化。
问题:配置后会出现vant组件的样式重复。
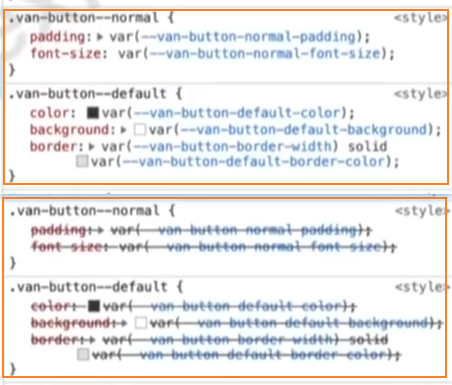
原因分析:这是因为在main.ts中导入的vant样式和自动注册组件时导入的vant样式重复了,导入了2次样式。
解决:设置组件自动导入的配置,让自动注册时不要导入样式。
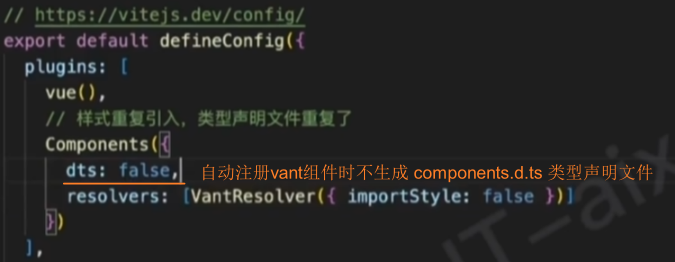
4、优化:类型声明文件重复的优化。(新版待确定)
问题:components.d.ts的类型声明文件时多余的,vant本身自带了类型声明。
解决:设置组件自动导入的配置,不生成类型声明文件 components.d.ts。
5、注意:安装了插件后,components目录下的组件也会自动注册,不需要再手动导入。
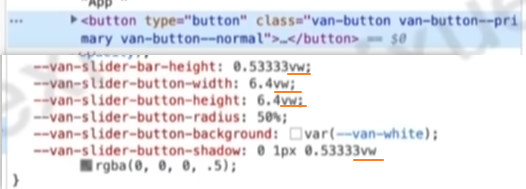
移动端适配
pnpm i postcss-px-to-viewport -D2、配置 postcss.config.js
// postcss.config.js
module.exports = {
  plugins: {
    'postcss-px-to-viewport': {
      viewportWidth: 375,
    },
  },
};3、重启项目生效
主题定制
使用css变量定制项目主题,和修改vant主题
CSS变量定义/使用
:root {
  --main-color: #999; /** 定义CSS全局变量 */
}
.footer {
  --footer-color: #f0f; /** 定义CSS局部变量 */
}
a {
  color: var(--main-color)  /** 使用CSS变量 */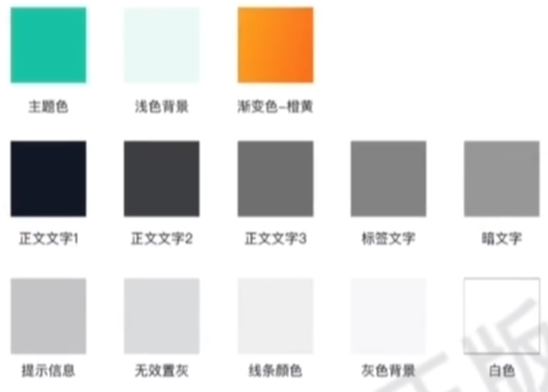
}项目主题
:root {
  // 问诊患者:色板
  --cp-primary: #16C2A3;
  --cp-plain: #EAF8F6;
  --cp-orange: #FCA21C;
  --cp-text1: #121826;
  --cp-text2: #3C3E42;
  --cp-text3: #6F6F6F;
  --cp-tag: #848484;
  --cp-dark: #979797;
  --cp-tip: #C3C3C5;
  --cp-disable: #D9DBDE;
  --cp-line: #EDEDED;
  --cp-bg: #F6F7F9;
  --cp-price: #EB5757;

  // 覆盖vant主题色
  --van-primary-color: var(--cp-primary);
}
集成-Store
useUserStore
TS类型
在type/user.d.ts中定义User的TS类型
// 用户信息
export type User = {
  /** token令牌 */
  token: string
  /** 用户ID */
  id: string
  /** 用户名称 */
  account: string
  /** 手机号 */
  mobile: string
  /** 头像 */
  avatar: string
}创建Store
1、在store/user.ts中创建useUserStore
import type { User } from '@/types/user'
import { defineStore } from 'pinia'
import { ref } from 'vue'

export const useUserStore = defineStore('cp-user', () => {
  // 用户信息
  const user = ref<User>()
  // 设置用户,登录后使用
  const setUser = (u: User) => {
    user.value = u
  }
  // 清空用户,退出后使用
  const delUser = () => {
    user.value = undefined
  }
  return { user, setUser, delUser }
})2、在组件中设置/删除user

Store持久化
思路:使用 pinia-plugin-persistedstate 实现pinia仓库状态持久化
1、安装 pinia-plugin-persistedstate 插件
pnpm i pinia-plugin-persistedstate2、在main.ts中使用插件

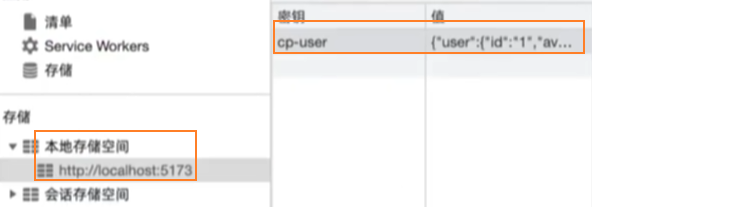
3、在 store/user.ts中配置本地持久化
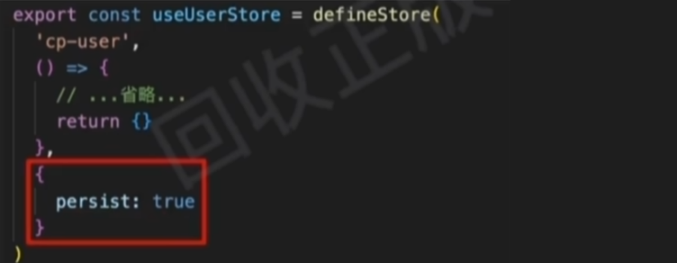
4、开启后store中的数据会被存储在localStorage中
统一管理
实现仓库统一从 store/index.ts 导出,代码简洁,职能单一,入口唯一
抽取实例
1、抽取pinia实例代码到 store/index.ts 中
import { createPinia } from 'pinia'
import persist from 'pinia-plugin-persistedstate'

// 1. 创建pinia实例
const pinia = createPinia()
// 2. 使用pinia插件
pinia.use(persist)
// 3. 导出pinia实例,给main使用
export default pinia2、在 main.ts 中挂载pinia实例
import { createApp } from 'vue'
import App from './App.vue'
import pinia from './stores'
import router from './router'
import './styles/main.scss'

const app = createApp(App)

app.use(pinia)
app.use(router)
app.mount('#app')统一导出模块
1、在store/index.ts 中统一导出Store模块
export * from './modules/user'2、在组件中使用导出的模块
-import { useUserStore } from './stores/user'
+import { useUserStore } from './stores'集成-axios
1、安装axios
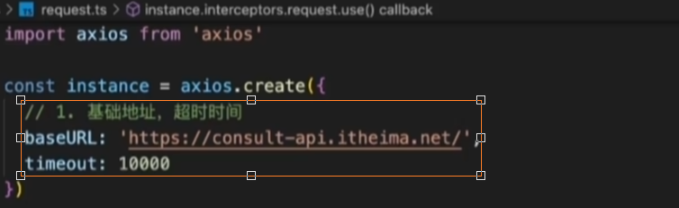
pnpm i axios2、baseURL,timeout
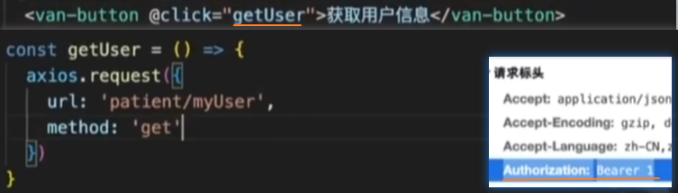
3、携带token
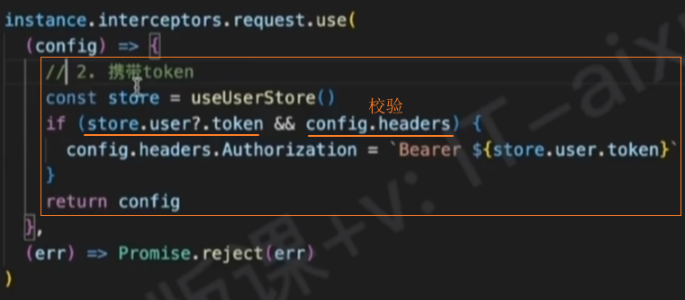
4、验证携带token
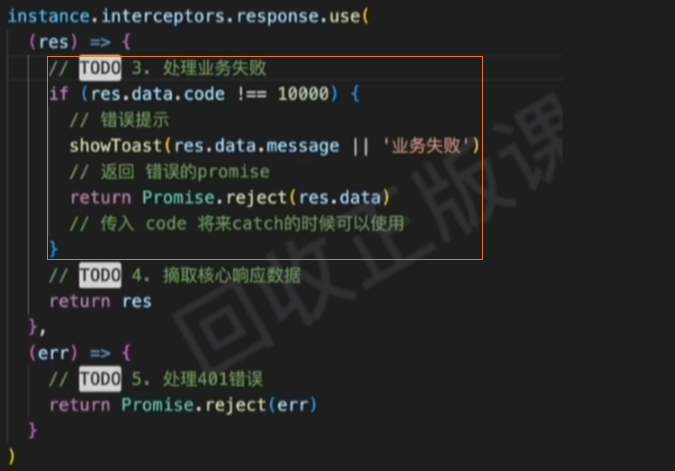
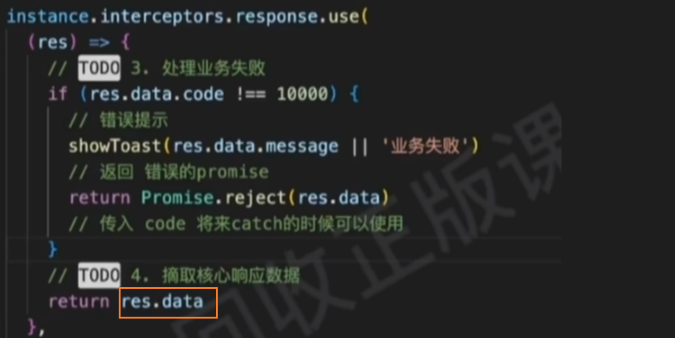
响应成功,业务失败处理
业务失败:响应数据返回的code不是10000(项目后端自定义的规则)。
失败处理:
- 弹出轻提示
- 此时返回一个失败的promise,传递code给catch,以便后续根据code进行不同的处理
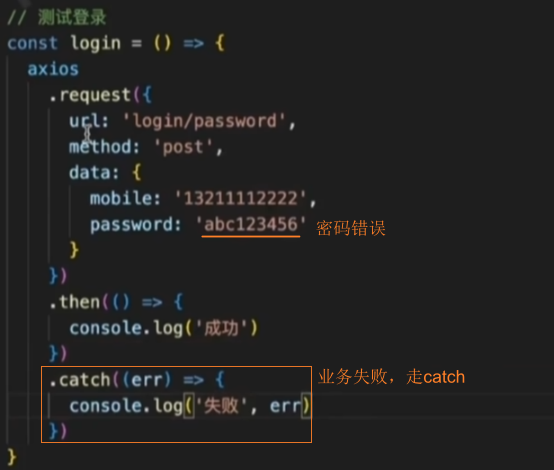
1、在axios响应拦截器中处理业务失败
2、测试:登录失败
返回核心数据
需求:业务逻辑成功,返回响应数据data,后续直接使用
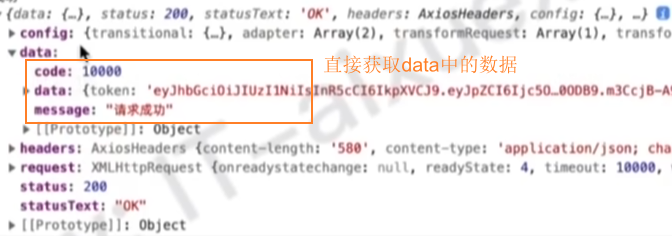
代码实现:
401错误处理
401错误:token失效。
401错误处理:
- 删除用户信息
- 跳转登录,带上接口失效所在页面的地址,登录完成后回跳使用
// 3. 响应拦截器,剥离无效数据,401拦截
instance.interceptors.response.use(
  (res) => {
    // 后台约定,响应成功,但是code不是10000,是业务逻辑失败
    if (res.data?.code !== 10000) {
      showToast(res.data?.message || '业务失败')
      return Promise.reject(res.data)
    }
    // 业务逻辑成功,返回响应数据,作为axios成功的结果
    return res.data
  },
  (err) => {
    if (err.response.status === 401) {
      // 1. 删除用户信息
      const store = useUserStore()
      store.delUser()
      // 2. 跳转登录,带上接口失效所在页面的地址,登录完成后回跳使用
      router.push({
        path: '/login',
        query: { returnUrl: router.currentRoute.value.fullPath }
      })
    }
    return Promise.reject(err)
  }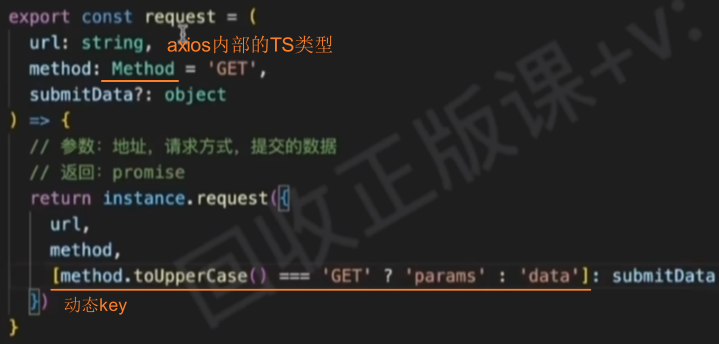
)封装请求函数
封装一个统一的请求函数,简化请求配置
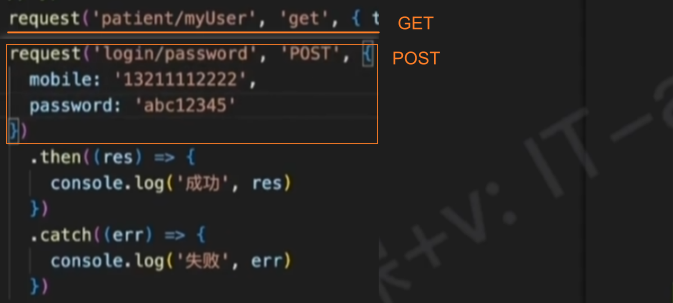
测试
设置响应数据类型
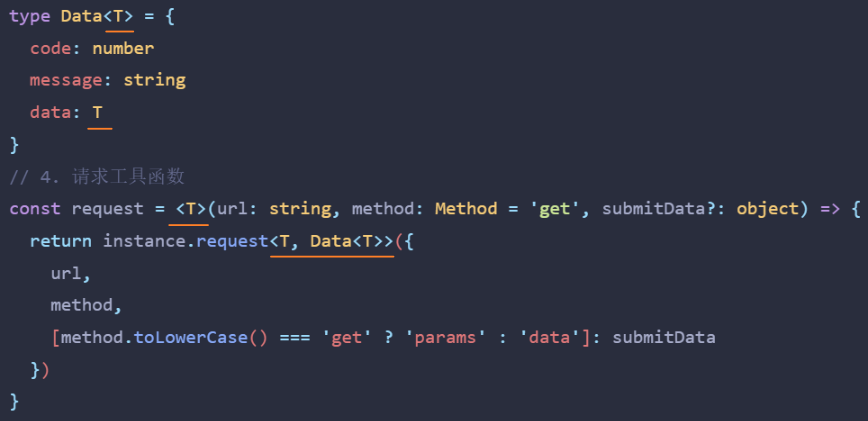
问题:为什么T传递给了instance.request<any, T>的第二个参数。
解释:第一个参数是给res设置的类型,但是在响应拦截器中返回的是res.data的数据,如果想给它设置类型,只能通过第二个参数。
打包svg地图@
Login
路由规则
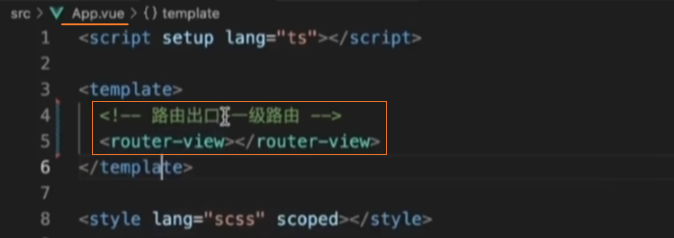
1、在router/index.ts中配置路由匹配规则

2、在App.vue中配置一级路由占位

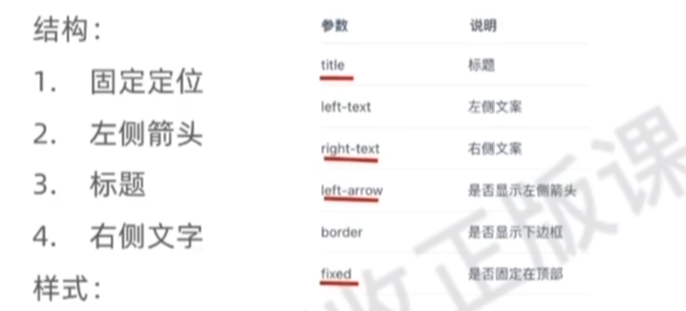
组件:cp-nav-bar

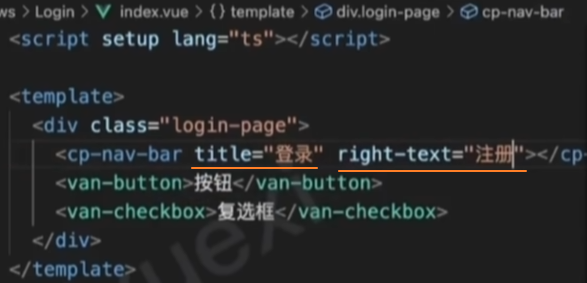
页面布局
1、vant相关属性
2、在login/index.vue中使用组件
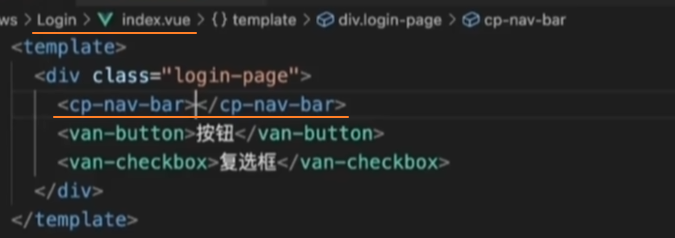
3、实现 <cp-nav-bar> 组件
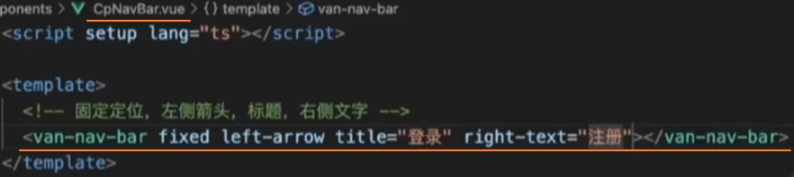

4、修改样式
注意:使用 :deep() 修改vant组件内部样式。


功能
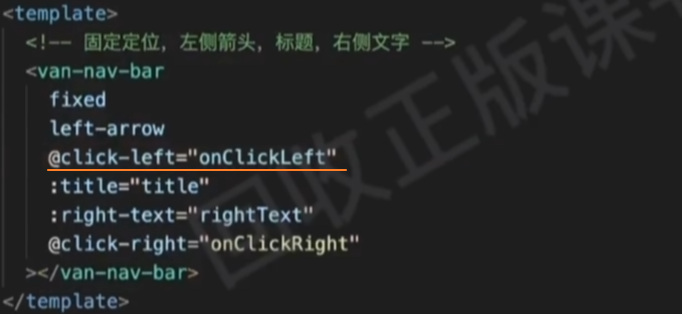
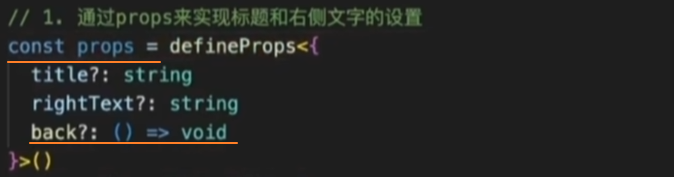
动态标题、右侧文字
思路:通过props来动态设置标题、右侧文字。
1、在子组件中,通过defineProps()接收传递的属性 title、rightText。
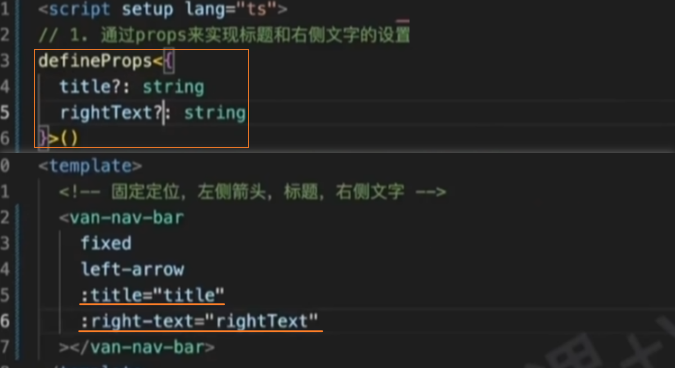
2、在父组件中,使用<cp-nav-bar> 组件时绑定属性 title、rightText。
右侧文字点击事件
思路:通过emit方法触发自定义右侧文字点击事件。
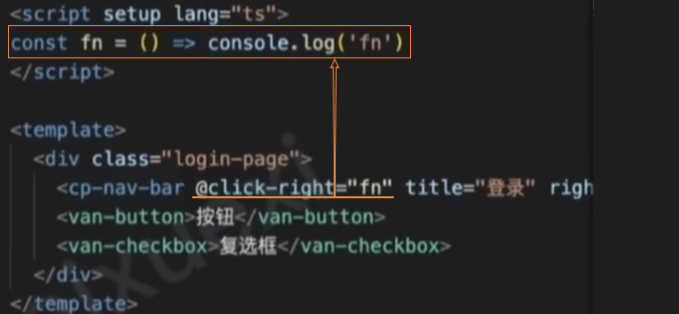
1、在子组件中,监听vant组件的@click-right事件,同时自定义@click-right事件向外发射该事件。
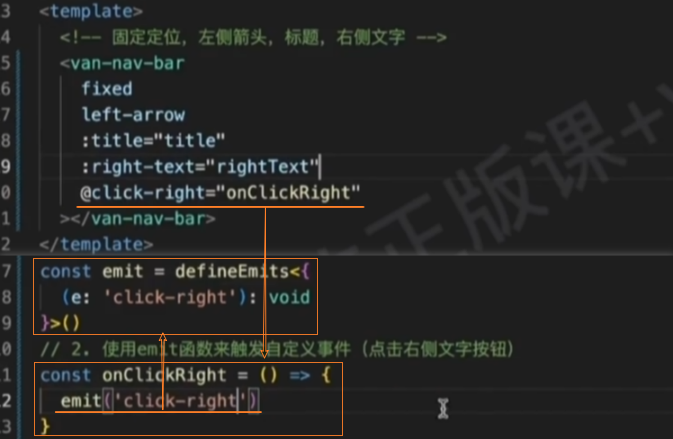
2、在父组件中,监听子组件传递过来的自定义事件@click-right。
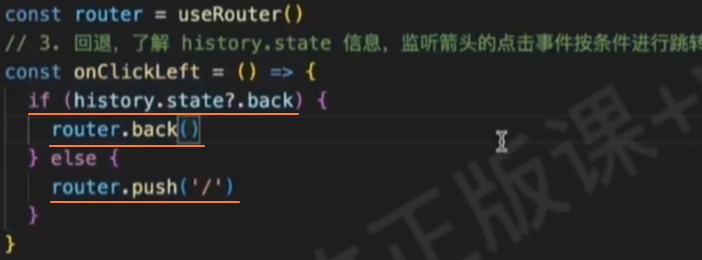
返回功能
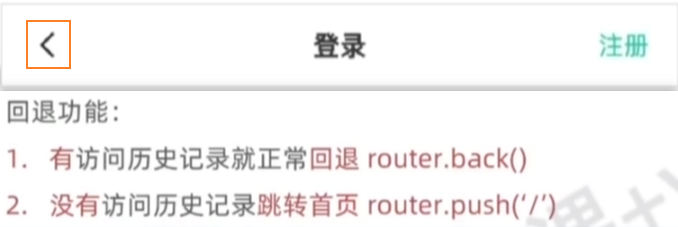
思路:通过 history.state访问历史记录信息。

1、在子组件中,监听@click-left事件
2、判断history.state.back是否有值,实现回退到不同页面。
组件类型提示@
问题:当前的组件<cp-nav-bar>是没有类型的:
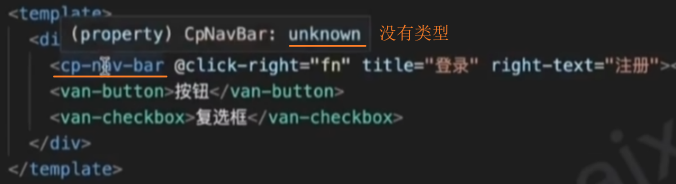
解决:
思路一:在使用时,显示(手动)导入组件。

思路二:对于全局组件或自动注册的组件,可以在
components.d.ts文件中添加全局组件类型。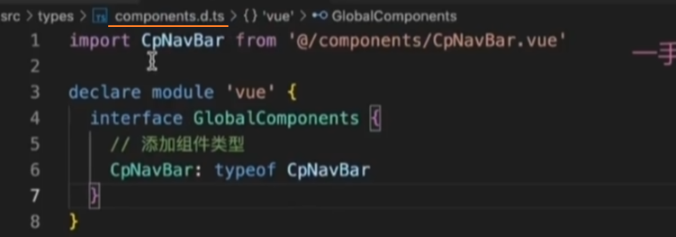
组件:login
页面布局
1、在style/main.scss中全局重置样式
// 全局样式
body {
  font-size: 14px;
  color: var(--cp-text1);
}
a {
  color: var(--cp-text2);
}
h1,h2,h3,h4,h5,h6,p,ul,ol {
  margin: 0;
  padding: 0;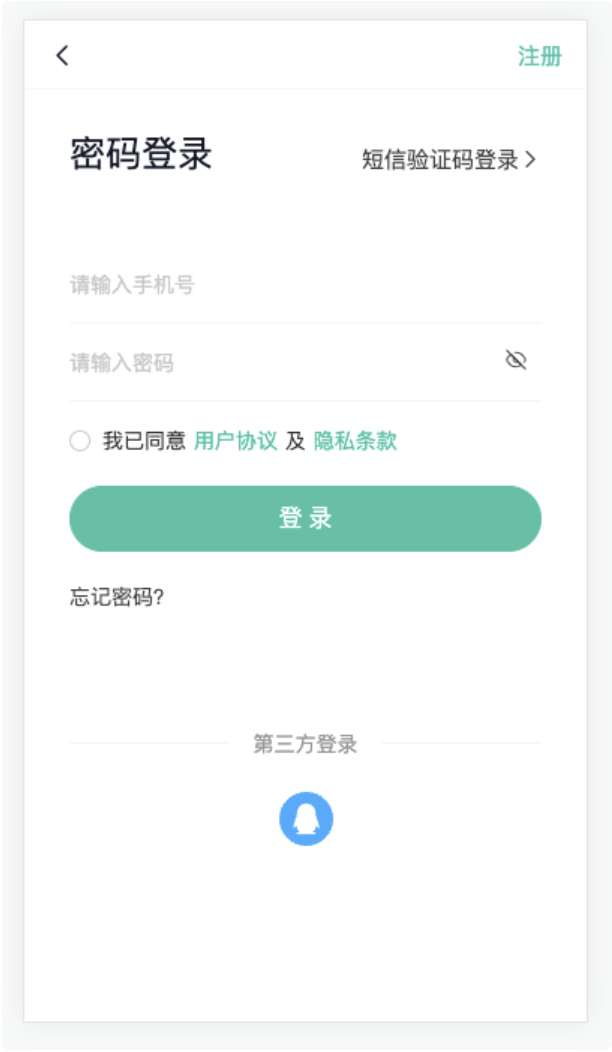
}2、页面结构
<script setup lang="ts"></script>

<template>
  <div class="login-page">
    <!-- 导航栏 -->
    <cp-nav-bar
      right-text="注册"
      @click-right="$router.push('/register')"
    ></cp-nav-bar>
    <!-- 头部 -->
    <div class="login-head">
      <h3>密码登录</h3>
      <a href="javascript:;">
        <span>短信验证码登录</span>
        <van-icon name="arrow"></van-icon>
      </a>
    </div>
    <!-- 表单 -->
    <van-form autocomplete="off">
      <van-field placeholder="请输入手机号" type="tel"></van-field>
      <van-field placeholder="请输入密码" type="password"></van-field>
      <div class="cp-cell">
        <van-checkbox>
          <span>我已同意</span>
          <a href="javascript:;">用户协议</a>
          <span>及</span>
          <a href="javascript:;">隐私条款</a>
        </van-checkbox>
      </div>
      <div class="cp-cell">
        <van-button block round type="primary">登 录</van-button>
      </div>
      <div class="cp-cell">
        <a href="javascript:;">忘记密码?</a>
      </div>
    </van-form>
    <!-- 底部 -->
    <div class="login-other">
      <van-divider>第三方登录</van-divider>
      <div class="icon">
        <img src="@/assets/qq.svg" alt="" />
      </div>
    </div>
  </div>
</template>3、样式
.login {
  &-page {
    padding-top: 46px;
  }
  &-head {
    display: flex;
    padding: 30px 30px 50px;
    justify-content: space-between;
    align-items: flex-end;
    line-height: 1;
    h3 {
      font-weight: normal;
      font-size: 24px;
    }
    a {
      font-size: 15px;
    }
  }
  &-other {
    margin-top: 60px;
    padding: 0 30px;
    .icon {
      display: flex;
      justify-content: center;
      img {
        width: 36px;
        height: 36px;
        padding: 4px;
      }
    }
  }
}
.van-form {
  padding: 0 14px;
  .cp-cell {
    height: 52px;
    line-height: 24px;
    padding: 14px 16px;
    box-sizing: border-box;
    display: flex;
    align-items: center;
    .van-checkbox {
      a {
        color: var(--cp-primary);
        padding: 0 5px;
      }
    }
  }
  .btn-send {
    color: var(--cp-primary);
    &.active {
      color: rgba(22,194,163,0.5);
    }
  }
}4、在style/main.scss中修改样式
  // 覆盖vant主体色
  --van-primary-color: var(--cp-primary);
  // 单元格上下间距
  --van-cell-vertical-padding: 14px;
  // 复选框大小
  --van-checkbox-size: 14px;
  // 默认按钮文字大小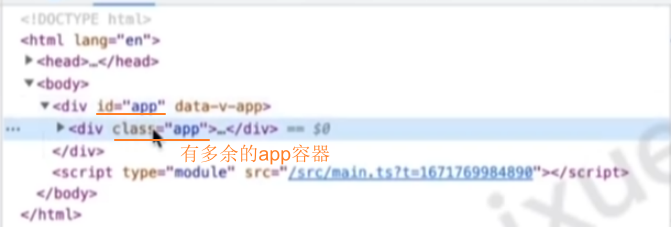
--van-button-normal-font-size: 16px;5、清除多余app容器
功能
表单校验
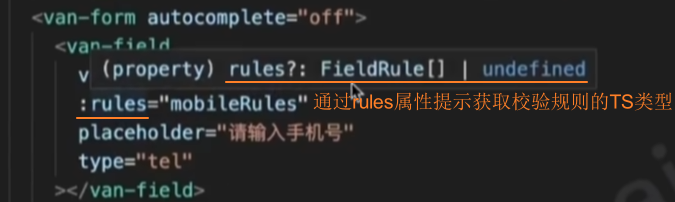
提取校验规则@
1、提取校验规则到utils/rule.ts文件。
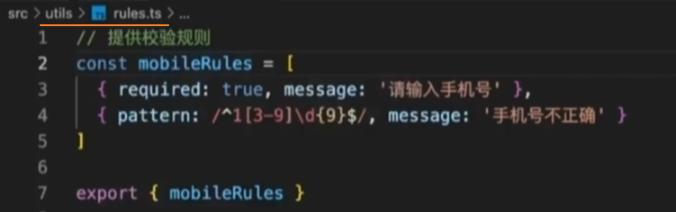
2、设置校验规则的TS类型
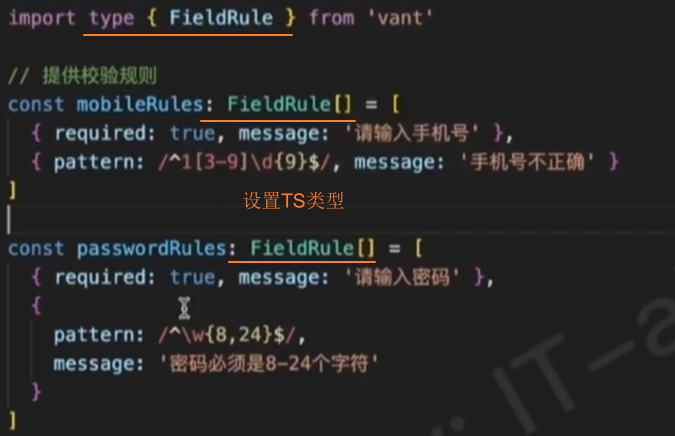
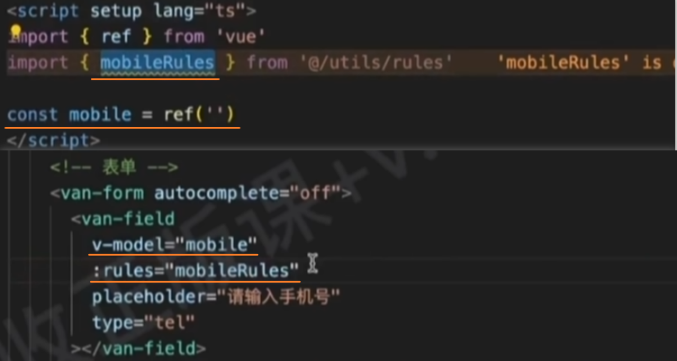
基本校验
1、校验手机号
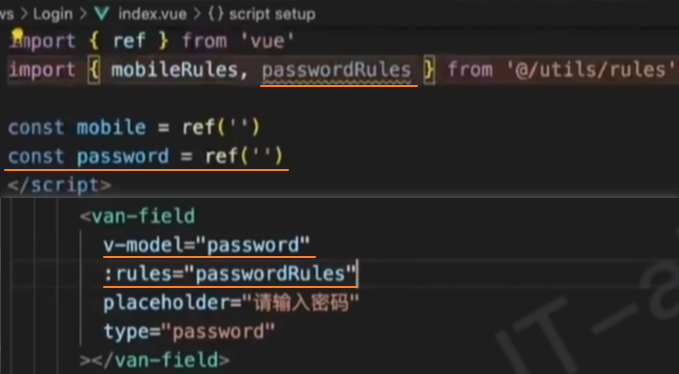
2、校验密码
3、表单整体校验,修改native-type属性

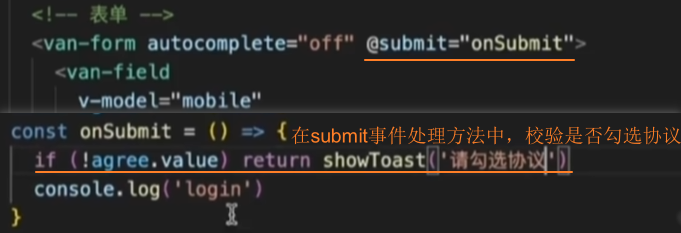
校验勾选协议
1、绑定 agree ,判断是否勾选协议
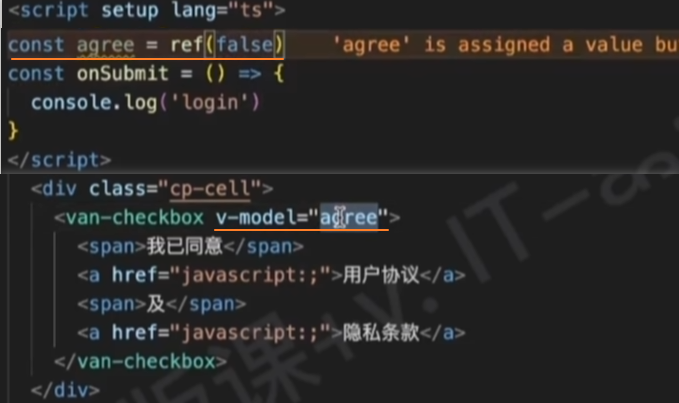
2、在submit事件处理方法中,校验是否勾选协议
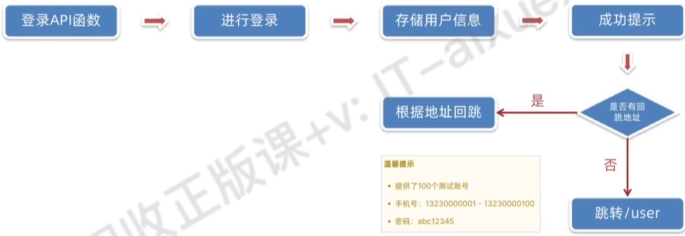
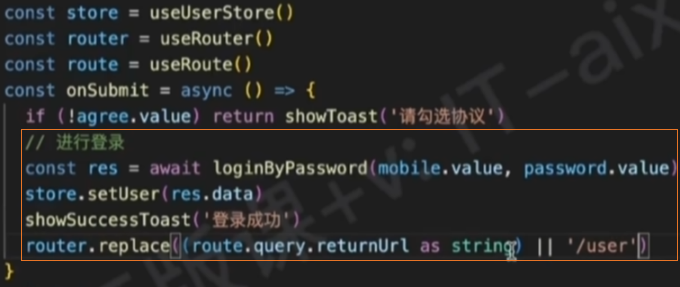
密码登录
接口
URL:
/login/password类型:
POST参数:
ts{ password: string, // 密码 mobile: string // 手机号 }返回数据:

密码登录
1、在 service/user.ts 中发送网络请求

2、在 login/login.vue 中执行密码登录
短信登录

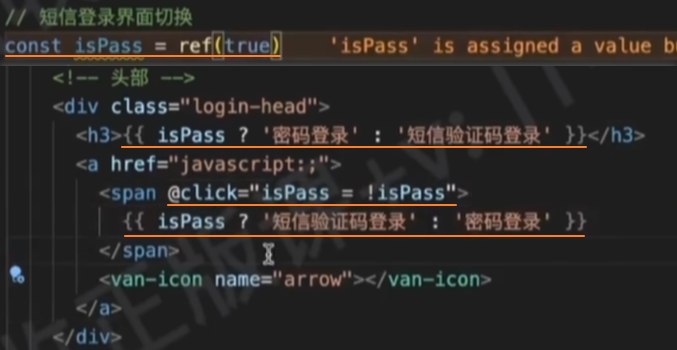
切换界面
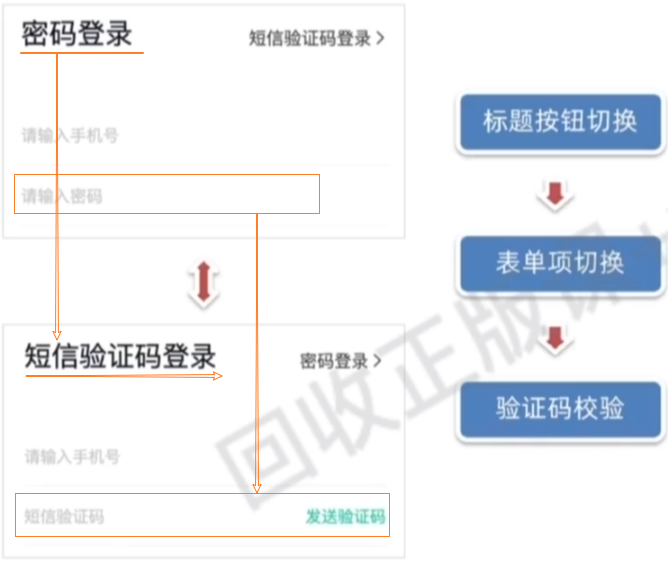
1、根据 isPass 切换密码登录和短信验证码登录界面
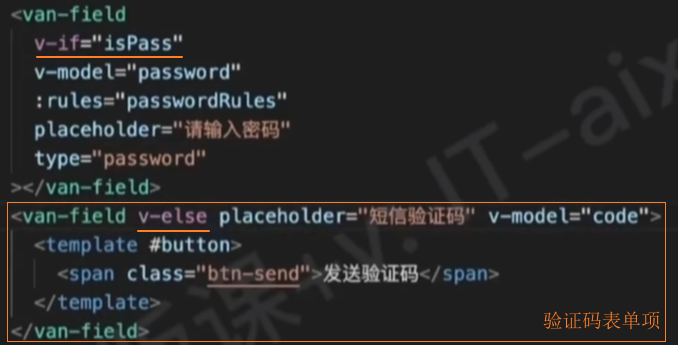
2、表单项切换
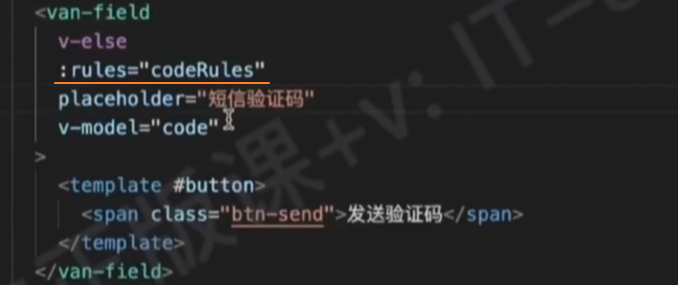
3、校验验证码

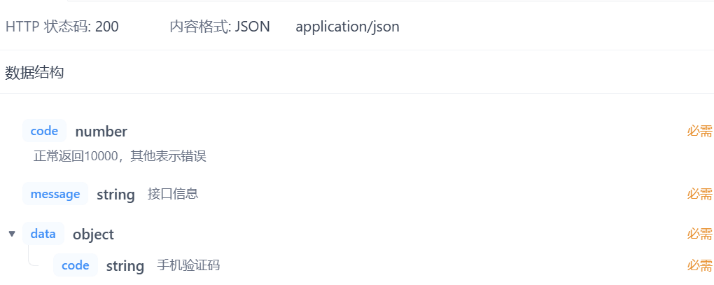
获取验证码-接口
URL:/code
类型:GET
token:携带
参数:
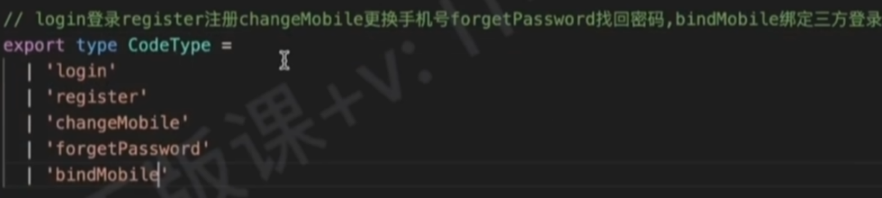
{
  mobile: string, // 手机号
  type: 'login' | 'register' | 'changeMobile' | 'forgetPassword' | 'bindMobile'
}返回数据:
获取验证码
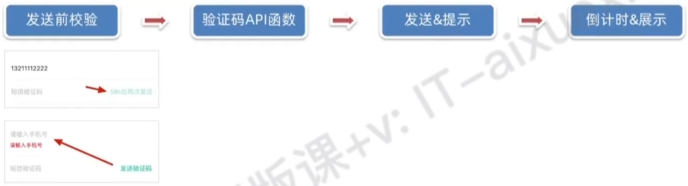
1、发送前校验
2、在 service/user.ts 中发送网络请求

3、在types/user.ts中定义CodeType联合类型
4、在login组件中,发送请求获取验证码,并设置倒计时
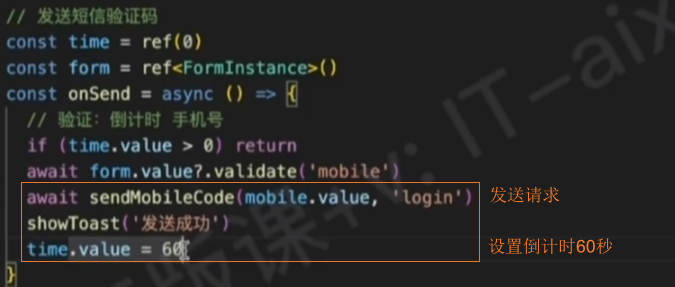
5、实现倒计时,并在结束时清理定时器
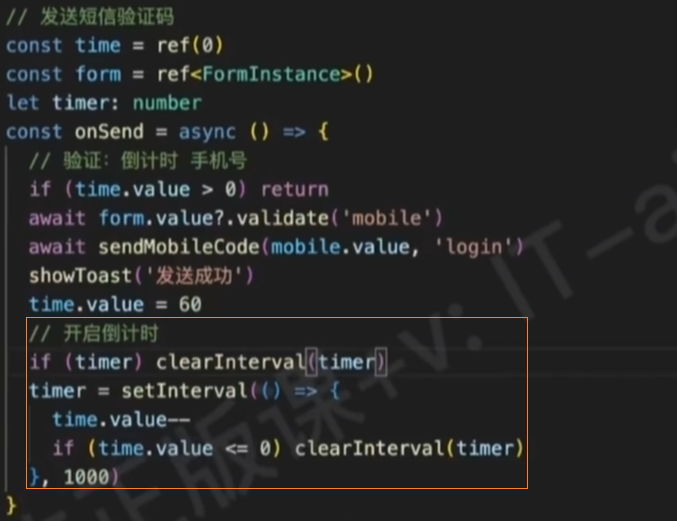
6、在组件销毁时清理定时器

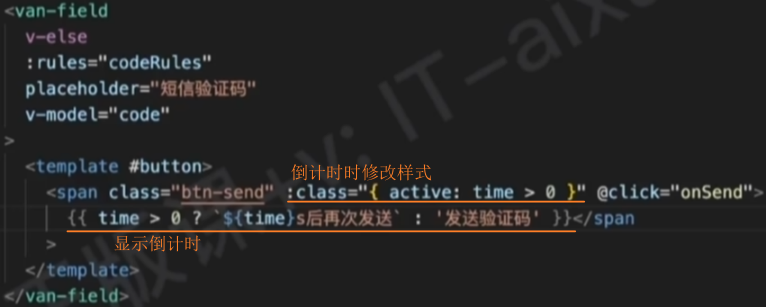
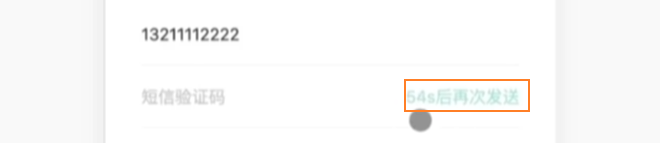
7、显示倒计时
短信登录-接口
URL:/login
类型:POST
token:携带
参数:
{
  code: string, // 验证码
  mobile: string // 手机号
}返回数据:

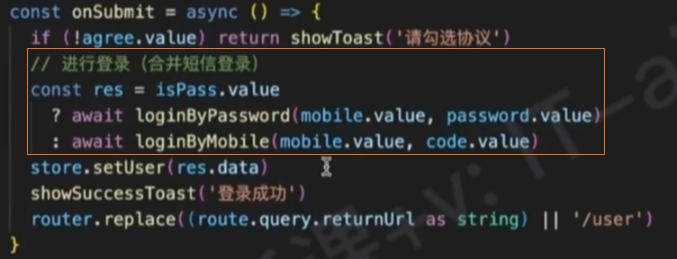
短信登录
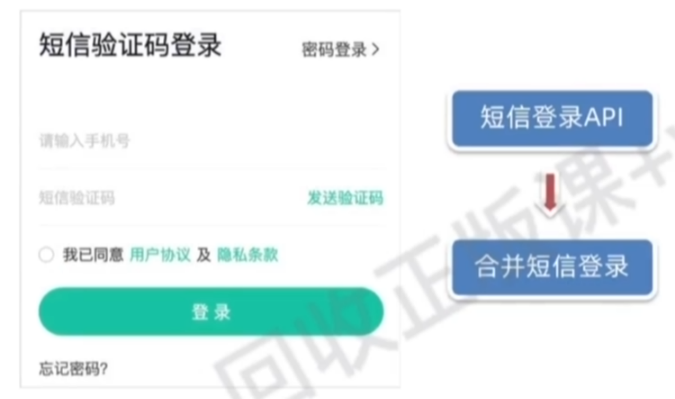
1、在 service/user.ts 中发送网络请求

2、在组件中将短信登录合并到密码登录逻辑中
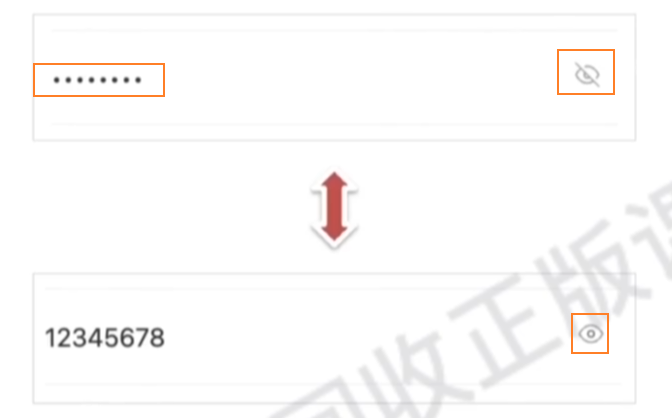
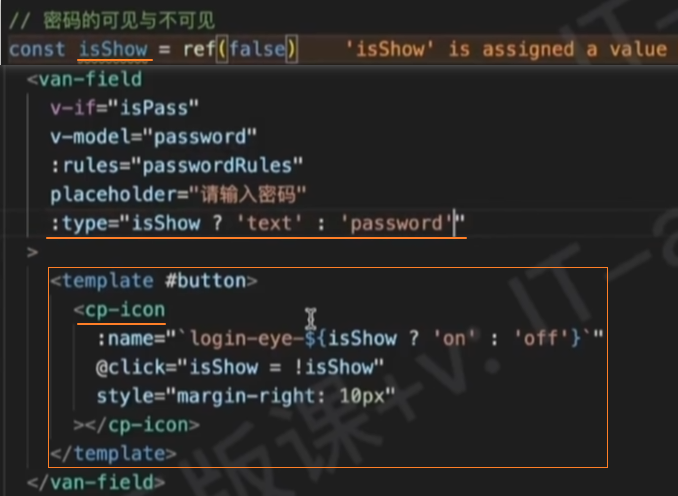
密码是否可见
第三方登录:login-callback@
路由规则

页面布局
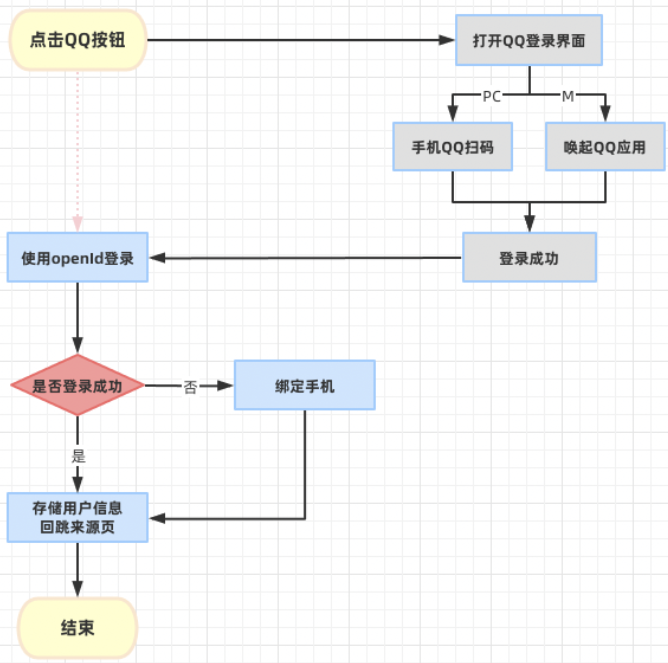
QQ登录
注册QQ互联
1、需要在 QQ互联 平台注册,并实名身份认证,审核通过。
3、创建web应用,需要有网站域名、域名备案号,设置登录成功回跳地址,审核通过。
4、得到 appid 和 回跳地址。
# 测试用 appid:102015968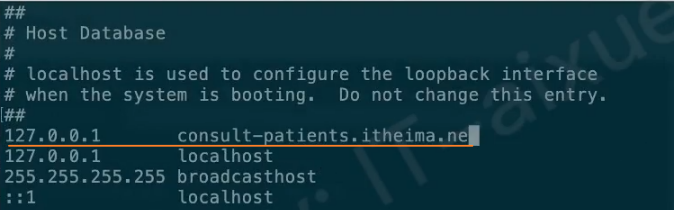
# 测试用 redirect_uri:http://consult-patients.itheima.net/login/callback配置服务器
1、修改hosts
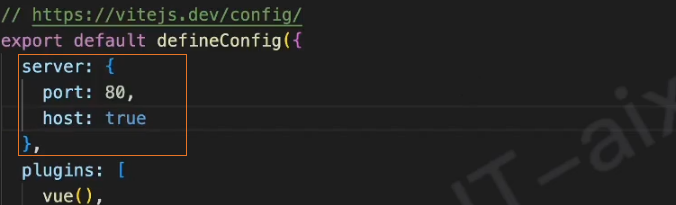
2、在vite.config.ts中修改项目服务器配置后重启,将端口改为80
3、在router/index.ts中修改之前配置的白名单 whiteList
生成跳转地址
1、 在 index.html 模板文件中,引入QQ互联提供的script文件

2、在login组件中,通过 QC.Login({}) 获取QQ登录的跳转地址,复制地址后该断代码就不需要了
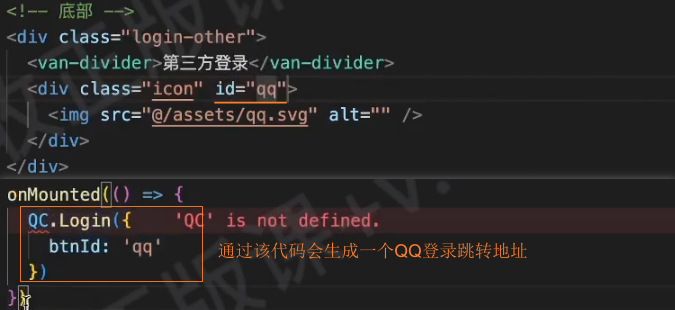
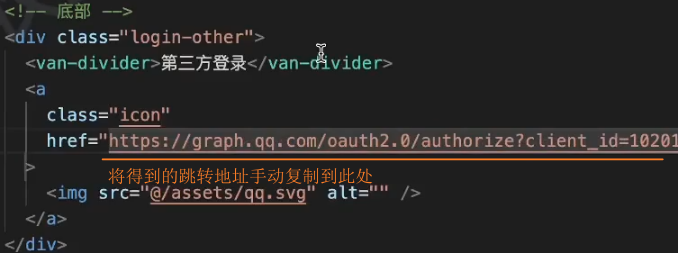
3、将得到的跳转地址手动复制到此处
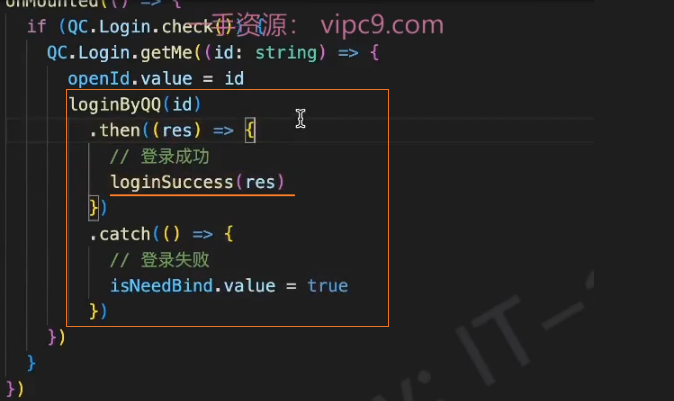
openId登录
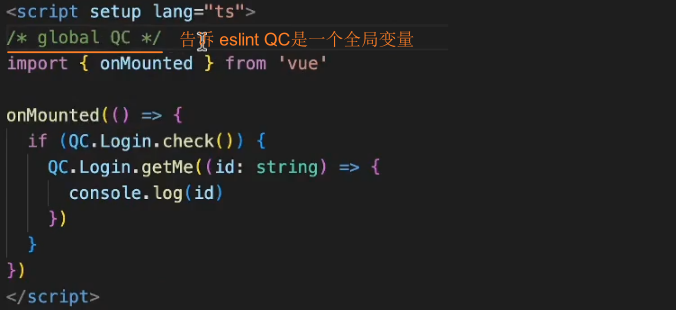
1、在login-callback组件的onMounted钩子中获取openId
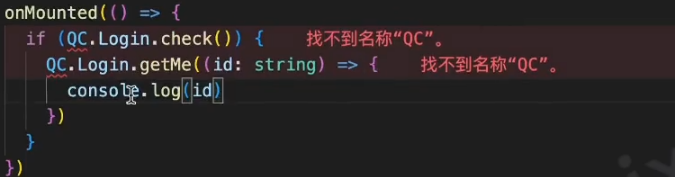
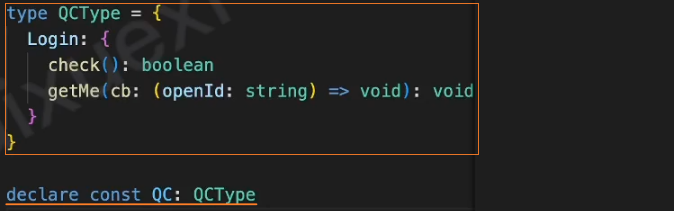
2、定义全局变量 QC 的TS类型
接口-第三方登录
URL:
/login/thirdparty类型:
POSTtoken:携带
参数:
ts{ openId: string // QQ登录返回的openid source: string // 默认传qq nickname?: string // 三方登录的昵称 avatar?: string // 三方登录的头像 }返回数据:
网络请求

实现第三方登录

手机绑定
页面布局
<template>
<div class="login-page" v-if="isNeedBind">
<cp-nav-bar></cp-nav-bar>
<div class="login-head">
<h3>手机绑定</h3>
</div>
<van-form autocomplete="off" ref="form">
<van-field name="mobile" placeholder="请输入手机号"></van-field>
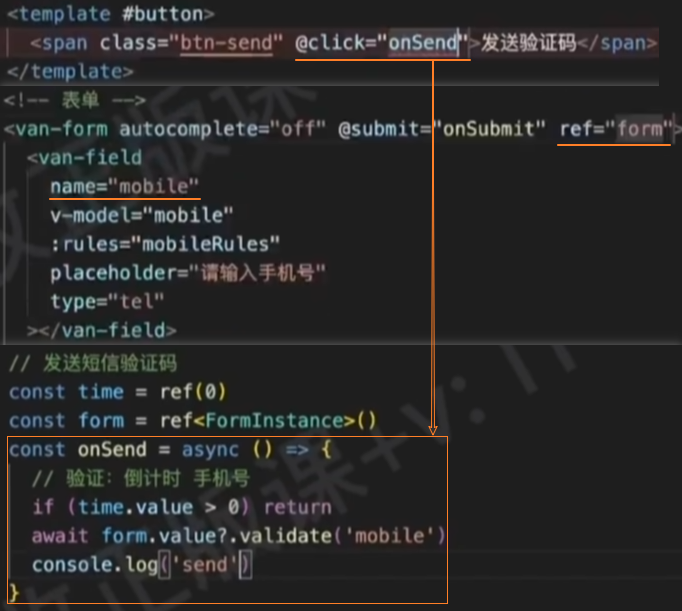
<van-field name="code" placeholder="请输入验证码">
<template #button>
<span class="btn-send">发送验证码</span>
</template>
</van-field>
<div class="cp-cell">
<van-button
style="margin-top: 50px"
block
round
type="primary"
native-type="submit"
>
立即绑定
</van-button>
</div>
</van-form>
</div>
</template>封装-发送验证码
1、在hooks中封装发送验证码功能
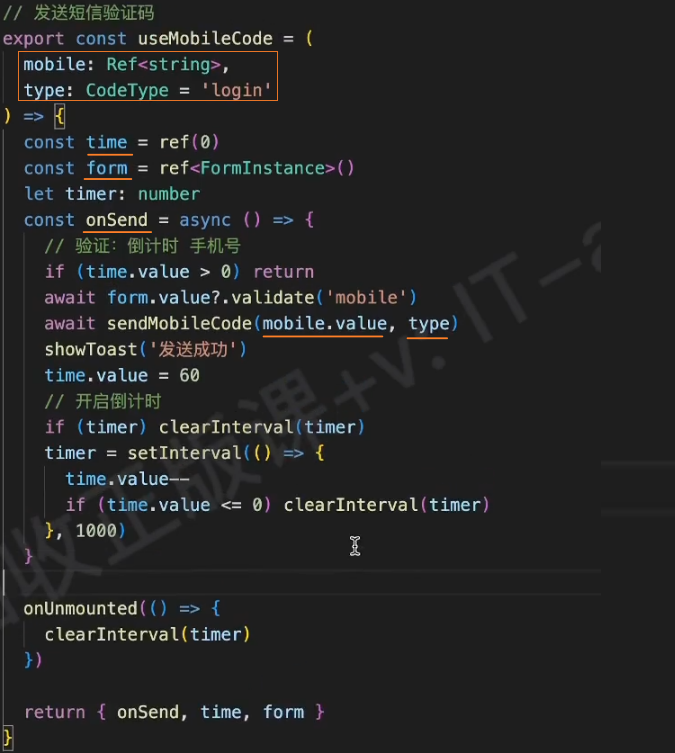
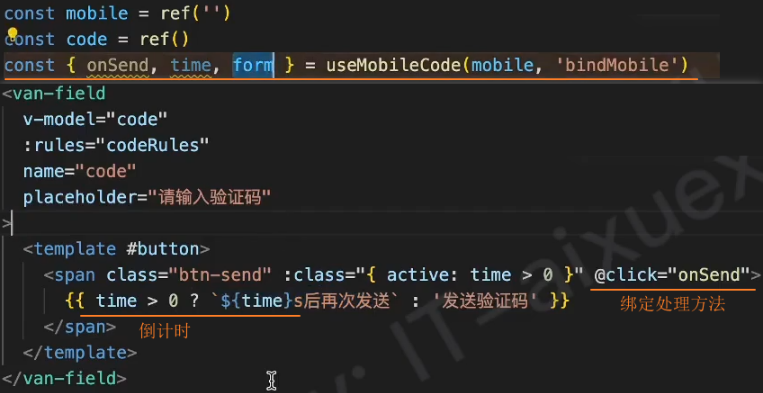
2、使用封装的发送验证码钩子

表单处理
1、绑定表单项,表单验证

2、发送验证码
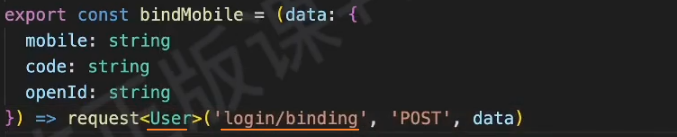
接口-绑定手机号
URL:
/login/binding类型:
POSTtoken:携带
参数:
ts{ mobile: string // 手机号 code: string // 验证码 openId: string // QQ登录返回的openid }返回数据:

网络请求
实现手机绑定
1、绑定 bind() 处理函数到form表单上

2、实现绑定手机号的逻辑
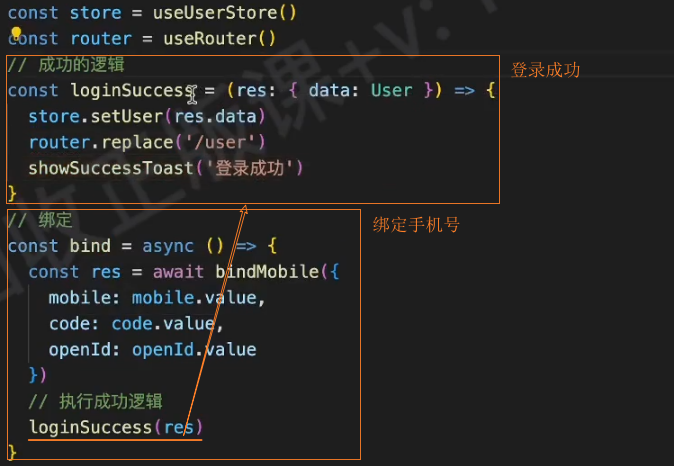
3、通过QQ登录成功后也调用登录成功的逻辑
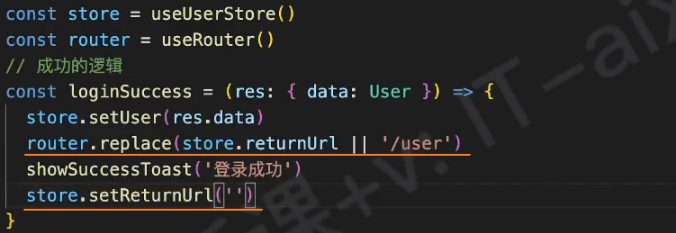
回跳地址
1、在userStore中记录回跳地址 returnUrl

2、在 login.vue 组件中调用 setReturnUrl 记录地址栏的returnUrl
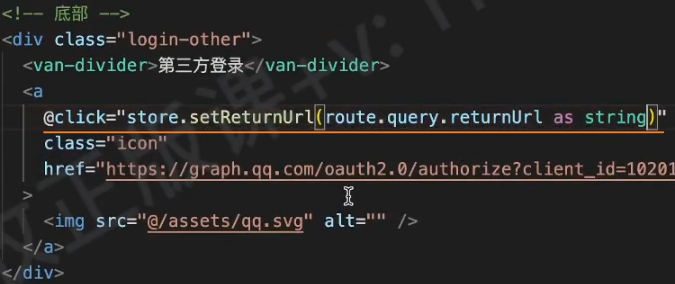
3、在 login-callback 组件中,等登录成功后跳转到记录的回跳地址,并清空store中的returnUrl
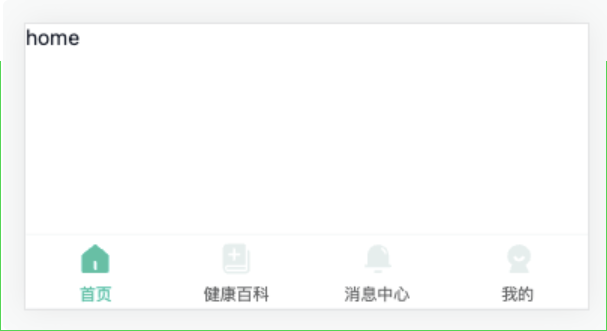
Layout
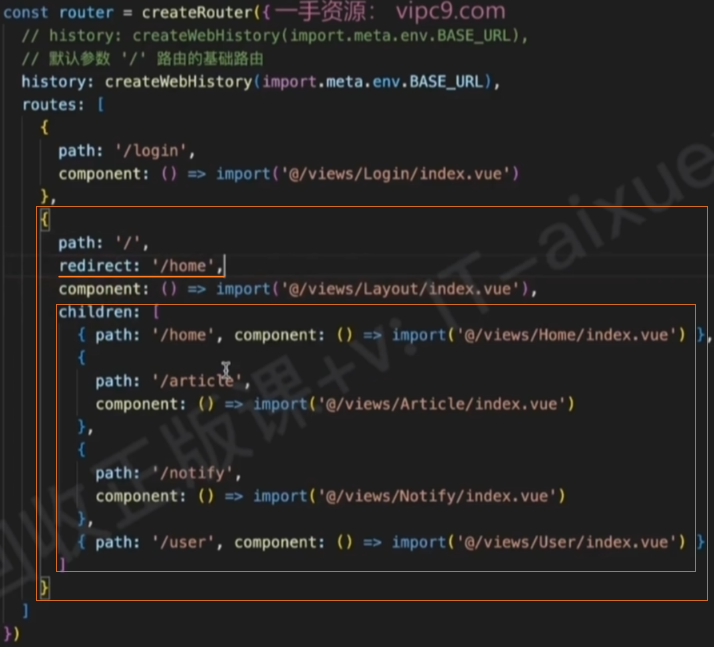
路由规则
1、在router/index.ts中配置路由匹配规则
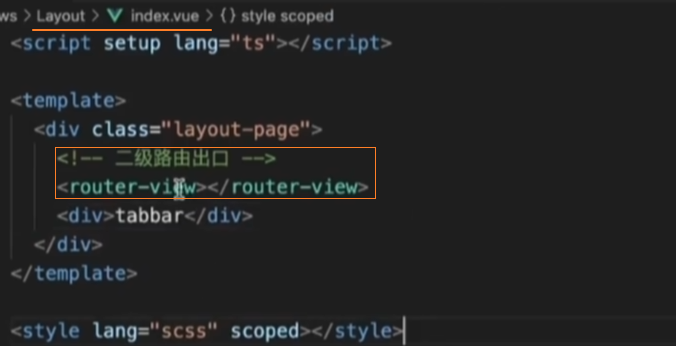
2、在views/layout/layout.vue中配置二级路由占位
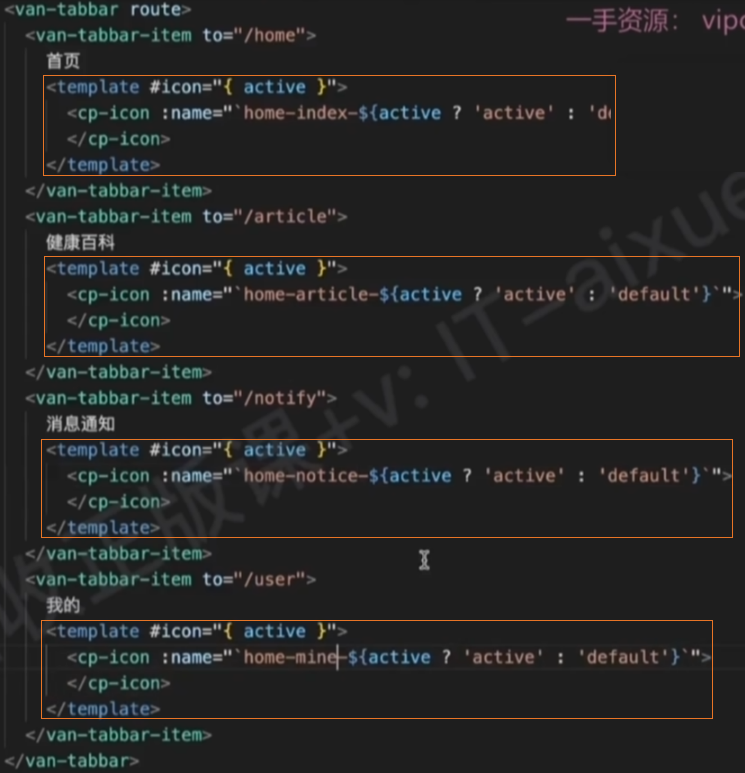
组件:van-tabbar


1、基本使用
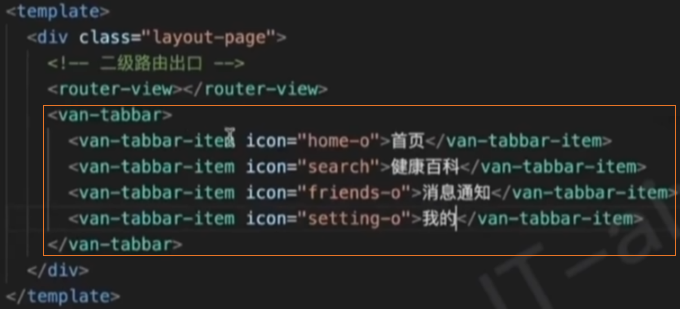
2、开启路由模式

3、自定义图标
4、修改样式
.layout-page {
  :deep() {
    .van-tabbar-item {
      &__icon {
        font-size: 21px;
      }
      &__text {
        font-size: 11px;
      }
      &:not(.van-tabbar-item--active) {
        color: var(--cp-text3);
      }
    }
  }
}功能
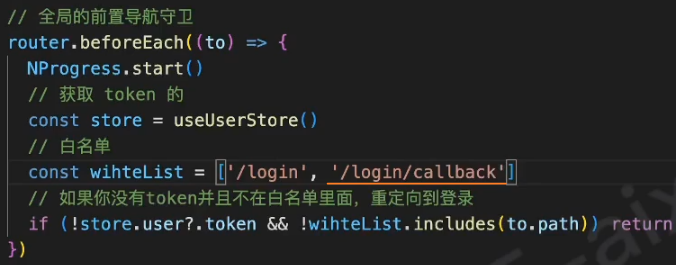
访问权限控制
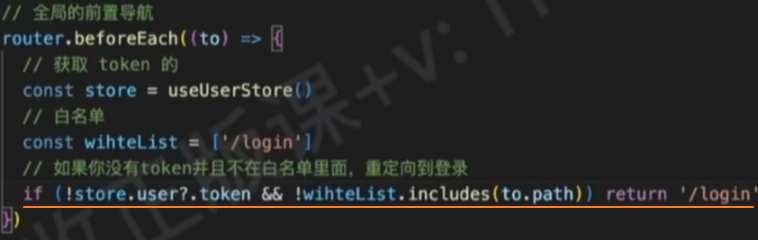
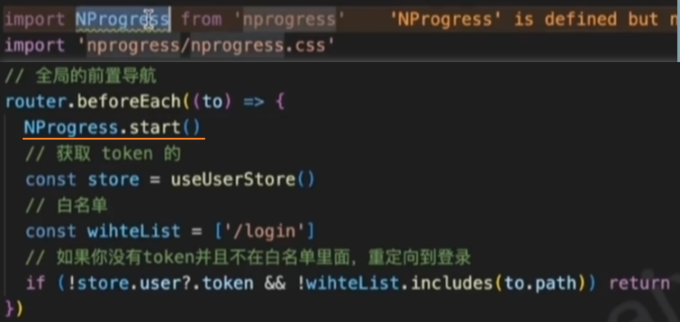
router.beforeEach():(guard),全局前置导航守卫,用于在每次路由跳转前执行自定义逻辑,如权限校验、数据预加载等。
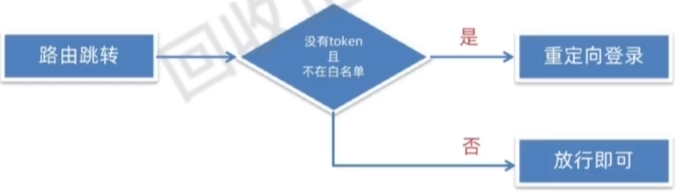
思路:在 router/index.ts 中添加全局前置导航守卫,校验是否有token、是否在白名单中。
白名单:不需要登录就可以访问的页面
页面标题
router.afterEach():(guard),全局后置守卫,用于注册一个在 导航完成之后 执行的钩子函数。它不会改变导航结果,常用于执行与导航结果无关的后续处理操作,如埋点统计、页面标题更新等。
1、在路由配置元信息 meta 中定义标题
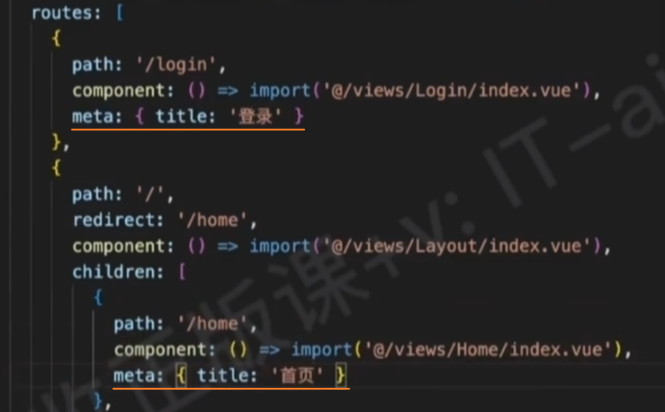
2、在 router/index.ts 中添加全局后置导航守卫,获取 meta 并设置标题

3、TS:如果需要TS提示title,可以通过扩展元信息类型实现

解决:新建 types/vue-router.d.ts 文件,并扩展元信息类型

加载进度
依赖包:nprogress
1、安装 nprogress和@types/nprogress
pnpm i nprogress
pnpm i @types/nprogress -D # TS类型提示2、在 router/index.ts 中导入并在前置守卫中开启
3、在 router/index.ts 中的后置守卫中结束

4、取消进度条的小圆圈动画

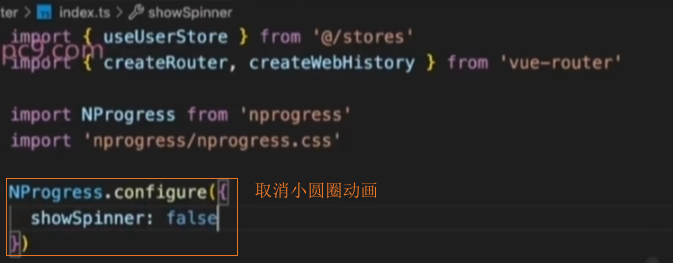
5、在 style/main.less 中修改进度条样式

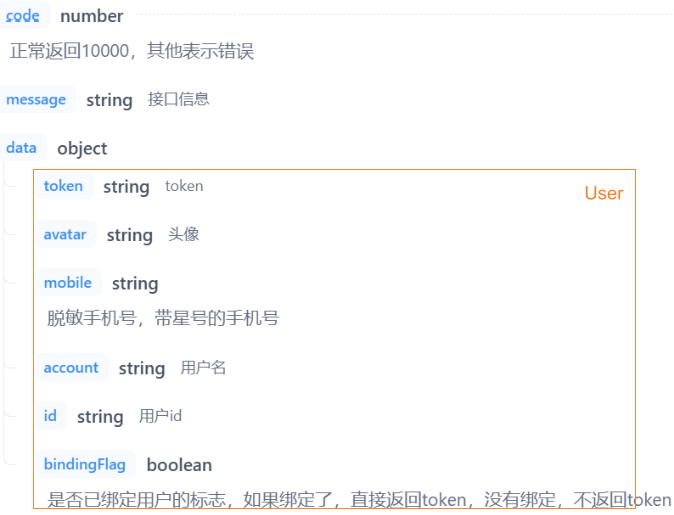
User
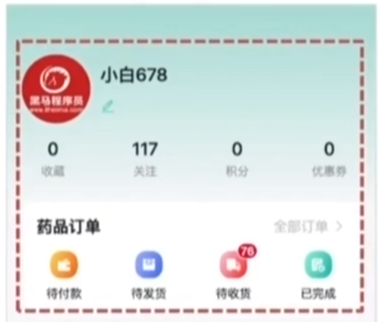
组件:user-info

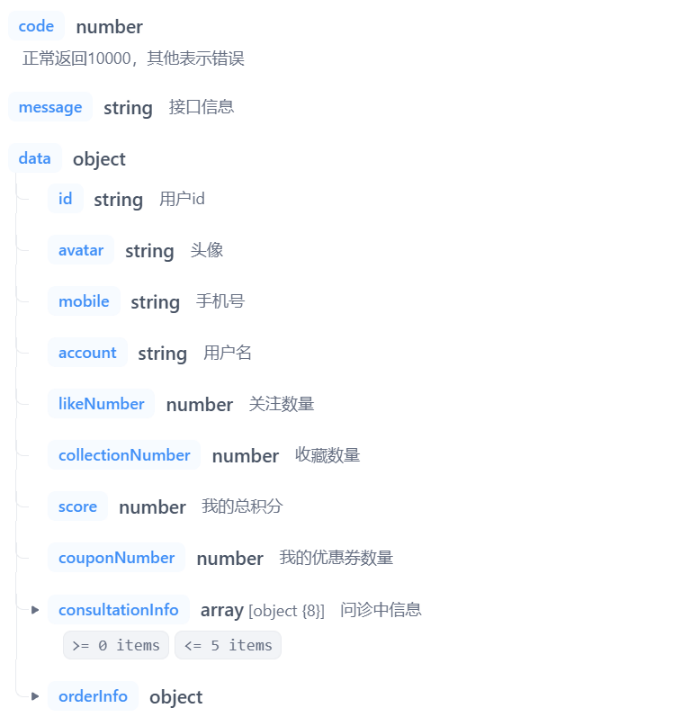
TS类型
知识点:Omit
知识点:Pick
// 用户信息
export type User = {
  token: string
  id: string
  account: string
  mobile: string
  avatar: string
}// 个人信息
type OmitUser = Omit<User, 'token'>
export type UserInfo = OmitUser & {
/** 关注 */
likeNumber: number
/** 收藏 */
collectionNumber: number
/** 积分 */
score: number
/** 优惠券 */
couponNumber: number
orderInfo: {
/** 待付款 */
paidNumber: number
/** 待发货 */
receivedNumber: number
/** 待收货 */
shippedNumber: number
/** 已完成 */
finishedNumber: number
}
}页面布局
<script setup lang="ts"></script>
<template>
<div class="user-page">
<div class="user-page-head">
<!-- 头部 -->
<div class="top">
<van-image
round
fit="cover"
src="https://yanxuan-item.nosdn.127.net/ef302fbf967ea8f439209bd747738aba.png"
/>
<div class="name">
<p>用户907456</p>
<p><van-icon name="edit" /></p>
</div>
</div>
<!-- 用户信息 -->
<van-row>
<van-col span="6">
<p>150</p>
<p>收藏</p>
</van-col>
<van-col span="6">
<p>23</p>
<p>关注</p>
</van-col>
<van-col span="6">
<p>270</p>
<p>积分</p>
</van-col>
<van-col span="6">
<p>3</p>
<p>优惠券</p>
</van-col>
</van-row>
</div>
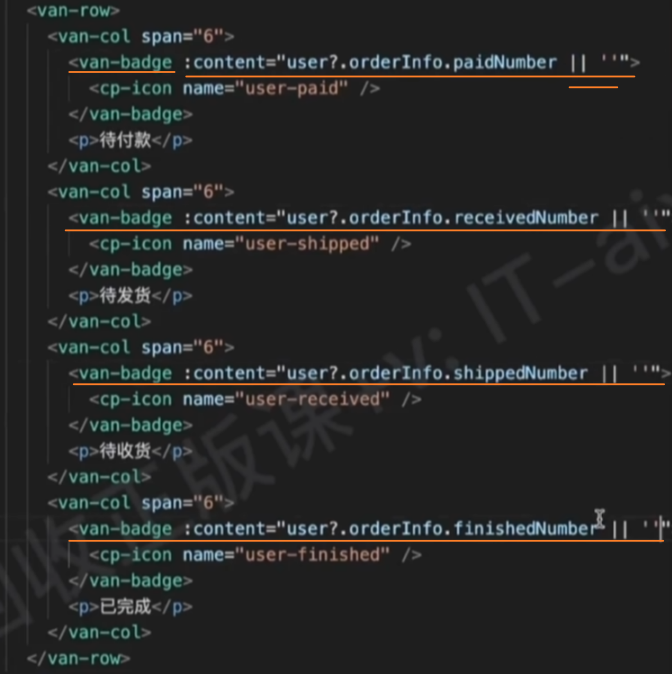
<!-- 药品订单 -->
<div class="user-page-order">
<div class="head">
<h3>药品订单</h3>
<router-link to="/order">全部订单 <van-icon name="arrow" /></router-link>
</div>
<van-row>
<van-col span="6">
<cp-icon name="user-paid" />
<p>待付款</p>
</van-col>
<van-col span="6">
<cp-icon name="user-shipped" />
<p>待发货</p>
</van-col>
<van-col span="6">
<cp-icon name="user-received" />
<p>待收货</p>
</van-col>
<van-col span="6">
<cp-icon name="user-finished" />
<p>已完成</p>
</van-col>
</van-row>
</div>
</div>
</template>2、样式
.user-page {
  background-color: var(--cp-bg);
  min-height: calc(100vh - 50px);
  padding: 0 15px 65px;
  // 头部
  &-head {
    height: 200px;
    background: linear-gradient(180deg, rgba(44, 181, 165, 0.46), rgba(44, 181, 165, 0));
    margin: 0 -15px;
    padding: 0 15px;
    .top {
      display: flex;
      padding-top: 50px;
      align-items: center;
      .van-image {
        width: 70px;
        height: 70px;
      }
      .name {
        padding-left: 10px;
        p {
          &:first-child {
            font-size: 18px;
            font-weight: 500;
          }
          &:last-child {
            margin-top: 10px;
            color: var(--cp-primary);
            font-size: 16px;
          }
        }
      }
    }
    .van-row {
      margin: 0 -15px;
      padding-top: 15px;
      p {
        text-align: center;
        &:first-child {
          font-size: 18px;
          font-weight: 500;
        }
        &:last-child {
          color: var(--cp-dark);
          font-size: 12px;
          padding-top: 4px;
        }
      }
    }
  }
  // 订单
  &-order {
    background-color: #fff;
    border-radius: 8px;
    margin-bottom: 15px;
    padding-bottom: 15px;
    .head {
      display: flex;
      justify-content: space-between;
      line-height: 50px;
      padding: 0 15px;
      a {
        color: var(--cp-tip);
      }
    }
    .van-col {
      text-align: center;
      .cp-icon {
        font-size: 28px;
      }
      p {
        font-size: 12px;
        padding-top: 4px;
      }
    }
  }
  // 分组
  &-group {
    background-color: #fff;
    border-radius: 8px;
    overflow: hidden;
    h3 {
      padding-left: 16px;
      line-height: 44px;
    }
    .van-cell {
      align-items: center;
    }
    .cp-icon {
      font-size: 17px;
      margin-right: 10px;
    }
  }
  .logout {
    display: block;
    margin: 20px auto;
    width: 100px;
    text-align: center;
    color: var(--cp-price);
  }
}接口
URL:
/patient/myUser类型:
GETtoken:携带
参数:无
返回数据:
渲染页面
1、在 service/user.ts 中发送网络请求

2、在组件中调用网路请求方法
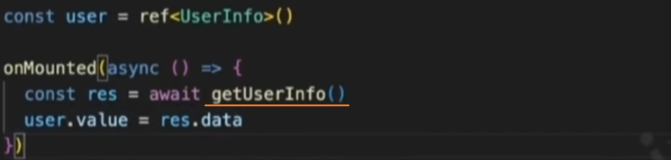
2、在组件中渲染请求的数据

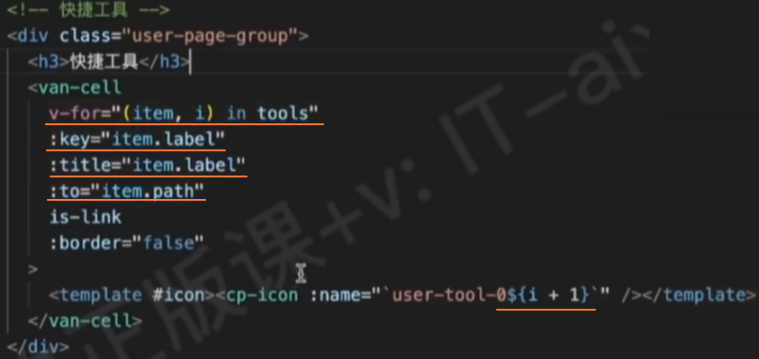
组件:user-quick-toolbar
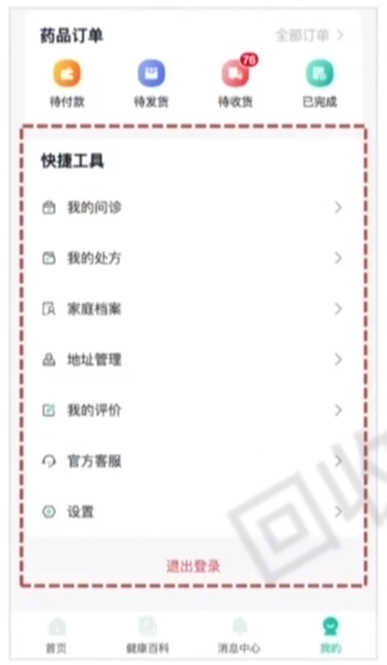
页面布局
1、快捷工具数据
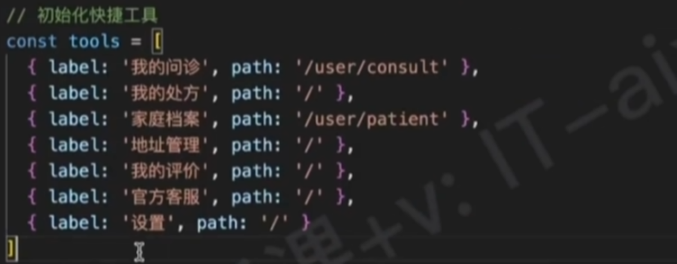
2、遍历渲染
3、退出登录

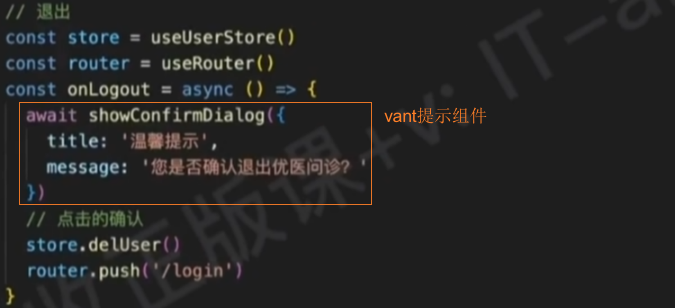
功能
退出登录
1、绑定点击事件

2、实现点击事件处理函数
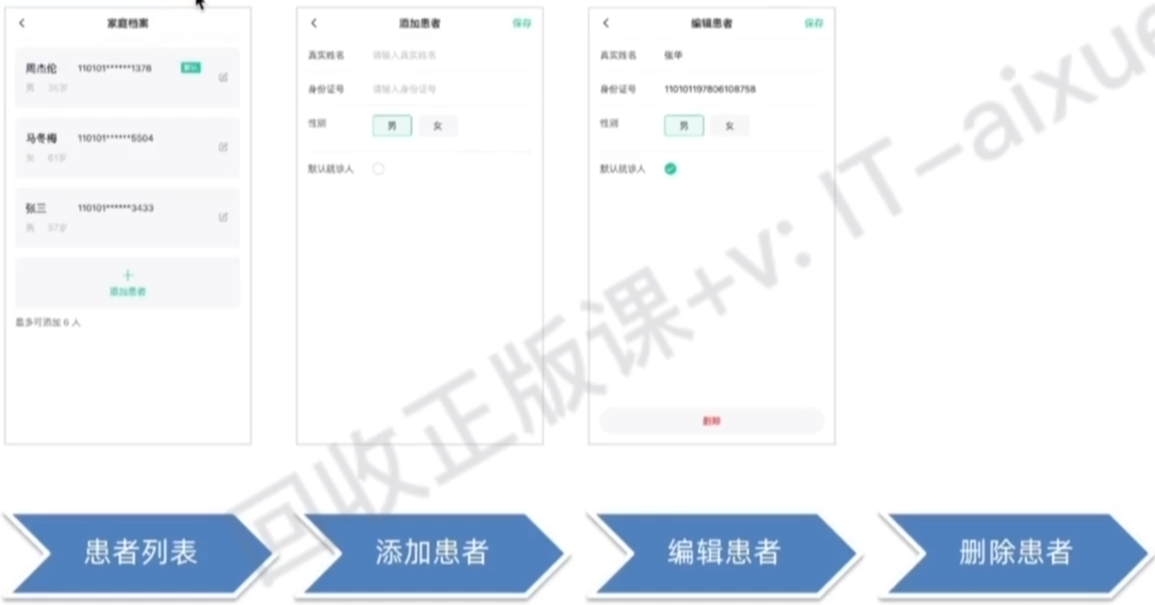
Patient
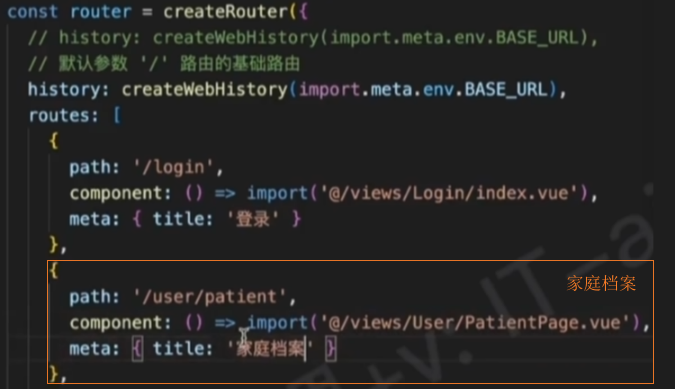
路由规则
组件:patient-list
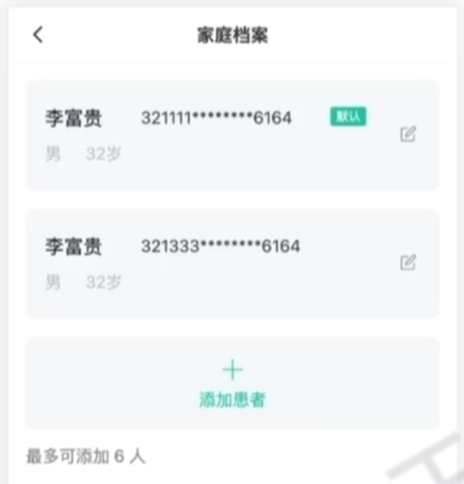

页面布局
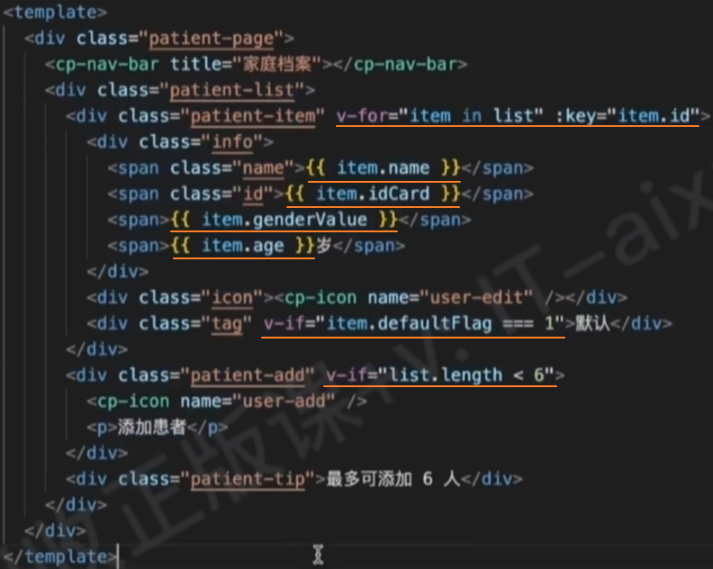
1、HTML
<script setup lang="ts"></script>

<template>
  <div class="patient-page">
    <!-- 导航栏 -->
    <cp-nav-bar title="家庭档案"></cp-nav-bar>

    <!-- 患者列表 -->
    <div class="patient-list">
      <div class="patient-item">
        <div class="info">
          <span class="name">李富贵</span>
          <span class="id">321111********6164</span>
          <span>男</span>
          <span>32岁</span>
        </div>
        <div class="icon"><cp-icon name="user-edit" /></div>
        <div class="tag">默认</div>
      </div>
      <div class="patient-item">
        <div class="info">
          <span class="name">李富贵</span>
          <span class="id">321333********6164</span>
          <span>男</span>
          <span>32岁</span>
        </div>
        <div class="icon"><cp-icon name="user-edit" /></div>
      </div>

      <!-- 添加患者 -->
      <div class="patient-add">
        <cp-icon name="user-add" />
        <p>添加患者</p>
      </div>

      <!-- 提示 -->
      <div class="patient-tip">最多可添加 6 人</div>
    </div>
  </div>
</template>2、样式
.patient-page {
  padding: 46px 0 80px;
}
.patient-list {
  padding: 15px;
}
.patient-item {
  display: flex;
  align-items: center;
  padding: 15px;
  background-color: var(--cp-bg);
  border-radius: 8px;
  margin-bottom: 15px;
  position: relative;
  border: 1px solid var(--cp-bg);
  transition: all 0.3s;
  overflow: hidden;
  .info {
    display: flex;
    flex-wrap: wrap;
    flex: 1;
    span {
      color: var(--cp-tip);
      margin-right: 20px;
      line-height: 30px;
      &.name {
        font-size: 16px;
        color: var(--cp-text1);
        width: 80px;
        margin-right: 0;
      }
      &.id {
        color: var(--cp-text2);
        width: 180px;
      }
    }
  }
  .icon {
    color: var(--cp-tag);
    width: 20px;
    text-align: center;
  }
  .tag {
    position: absolute;
    right: 60px;
    top: 21px;
    width: 30px;
    height: 16px;
    font-size: 10px;
    color: #fff;
    background-color: var(--cp-primary);
    border-radius: 2px;
    display: flex;
    justify-content: center;
    align-items: center;
  }
  &.selected {
    border-color: var(--cp-primary);
    background-color: var(--cp-plain);
    .icon {
      color: var(--cp-primary);
    }
  }
}
.patient-add {
  background-color: var(--cp-bg);
  color: var(--cp-primary);
  text-align: center;
  padding: 15px 0;
  border-radius: 8px;
  .cp-icon {
    font-size: 24px;
  }
}
.patient-tip {
  color: var(--cp-tag);
  padding: 12px 0;
}
.pb4 {
  padding-bottom: 4px;
}接口
URL:
/patient/mylist类型:
GETtoken:携带
参数:无
返回数据:
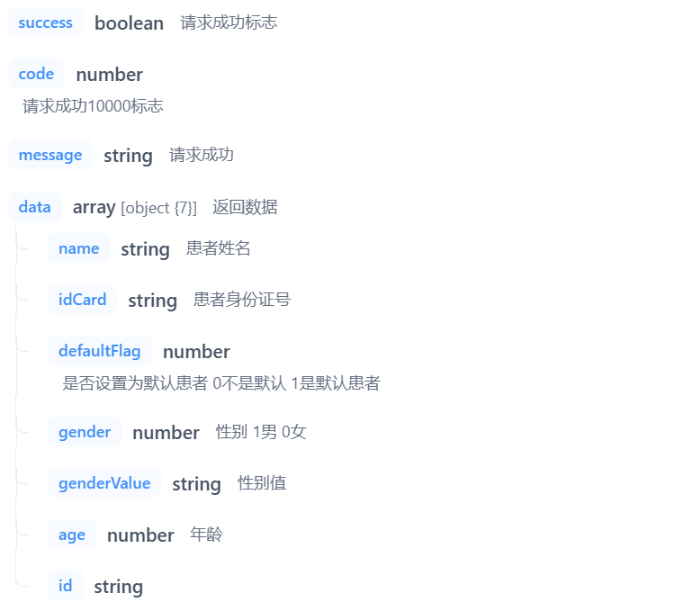
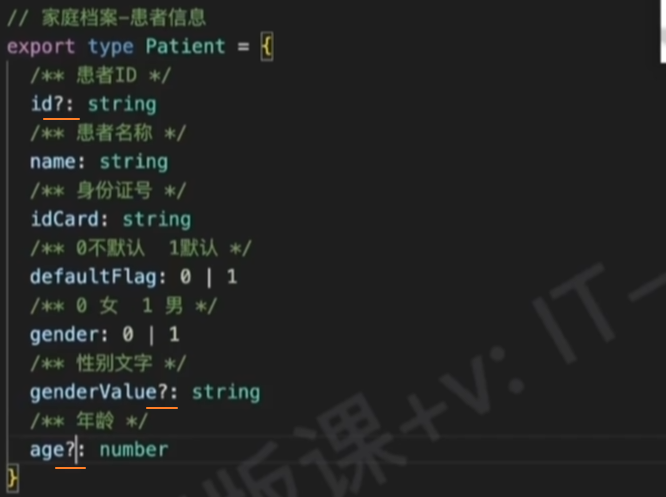
TS类型
// 家庭档案-患者信息
export type Patient = {
  /** 患者ID */
  id: string
  /** 患者名称 */
  name: string
  /** 身份证号 */
  idCard: string
  /** 0不默认  1默认 */
  defaultFlag: 0 | 1
  /** 0 女  1 男 */
  gender: 0 | 1
  /** 性别文字 */
  genderValue: string
  /** 年龄 */
  age: number
}

// 家庭档案-患者信息列表
export type PatientList = Patient[]渲染页面
1、在 services/user.ts 中发送网络请求

2、在组件中,调用请求方法,获取数据
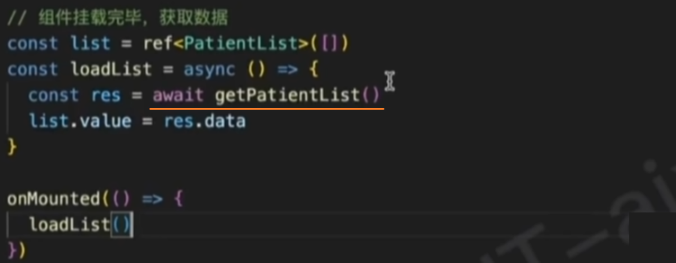
3、渲染数据
功能
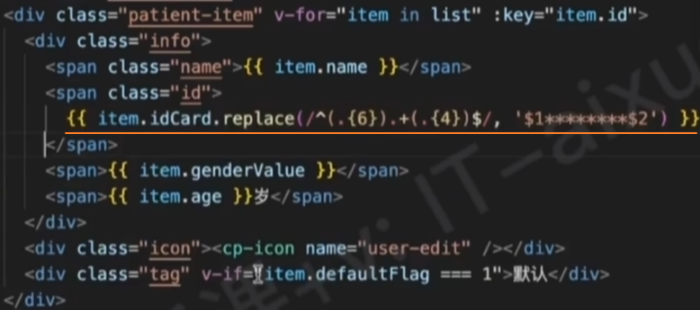
身份证脱敏@
知识点:通过$1、$2可以获取正则匹配到的内容。
添加患者
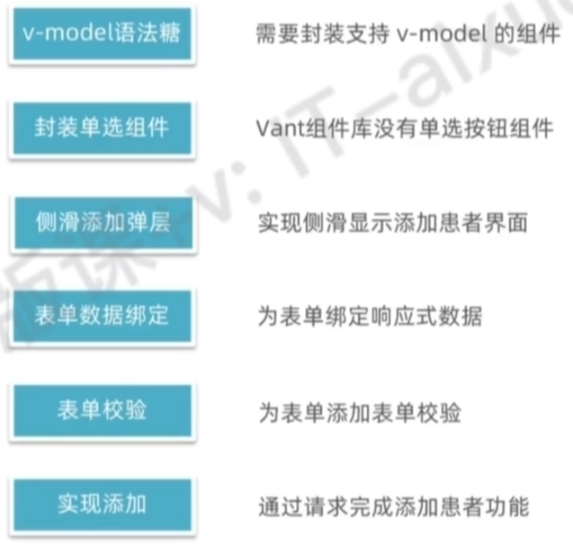
组件:cp-radio-btn
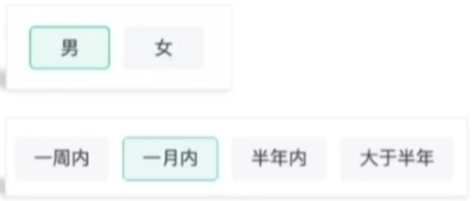

页面布局
1、HTML
<script setup lang="ts"></script>

<template>
  <div class="cp-radio-btn">
    <a class="item" href="javascript:;">男</a>
    <a class="item" href="javascript:;">女</a>
  </div>
</template>2、样式
.cp-radio-btn {
  display: flex;
  flex-wrap: wrap;
  .item {
    height: 32px;
    min-width: 60px;
    line-height: 30px;
    padding: 0 14px;
    text-align: center;
    border: 1px solid var(--cp-bg);
    background-color: var(--cp-bg);
    margin-right: 10px;
    box-sizing: border-box;
    color: var(--cp-text2);
    margin-bottom: 10px;
    border-radius: 4px;
    transition: all 0.3s;
    &.active {
      border-color: var(--cp-primary);
      background-color: var(--cp-plain);
    }
  }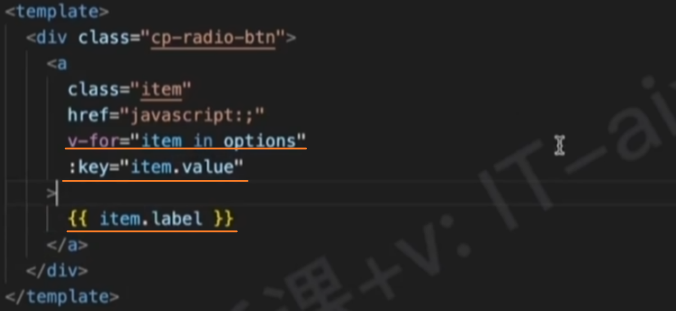
}动态渲染选项
1、定义选项数据

2、使用组件,并传入数据

3、接收并遍历渲染数据

功能
切换选中项
1、在父组件中定义 gender 属性,并绑定到 modelValue上

2、在子组件中接收 gender 属性,并根据gender值设置active样式
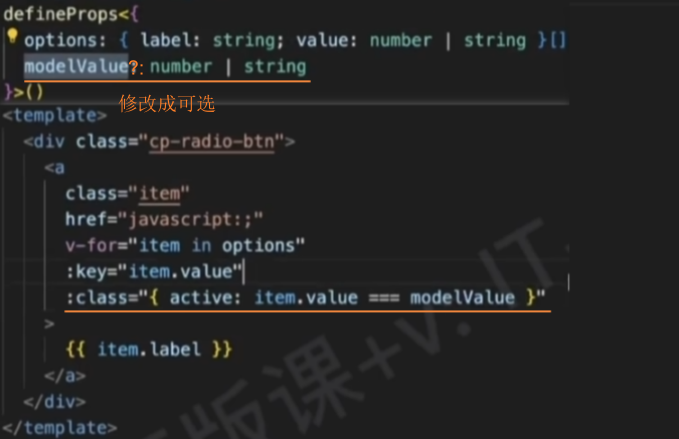
3、绑定点击事件,向外发射自定义事件 @update:modelValue

4、在父组件中绑定子组件传递的自定义事件 @update:modelValue
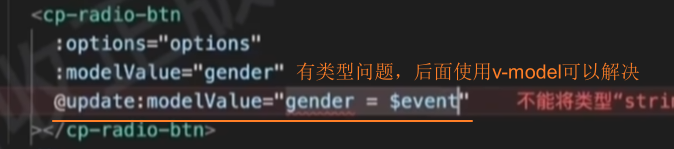
5、重构:使用v-model重构

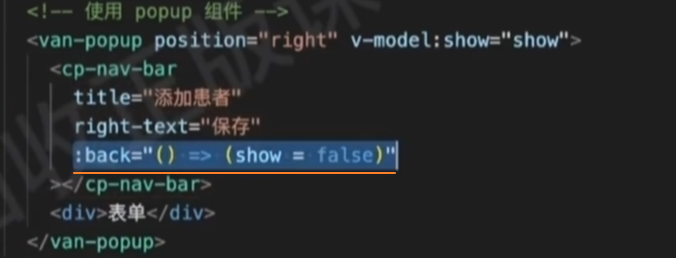
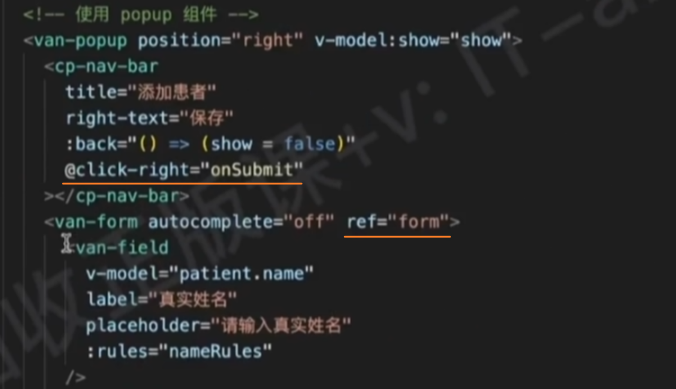
显示弹层
1、在 patient-list组件中,使用 van-popup 组件添加弹层

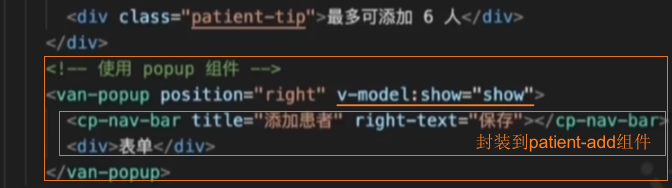
2、点击 添加患者 按钮,展示弹层


3、修改弹层样式
.patient-page {
  padding: 46px 0 80px;
  :deep() {
    .van-popup {
      width: 80%;
      height: 100%;
    }
  }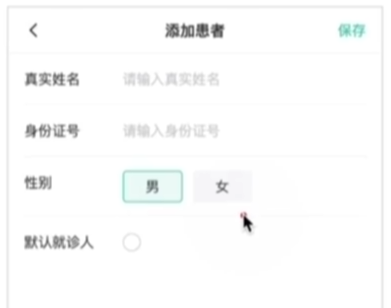
}组件:patient-add


页面布局
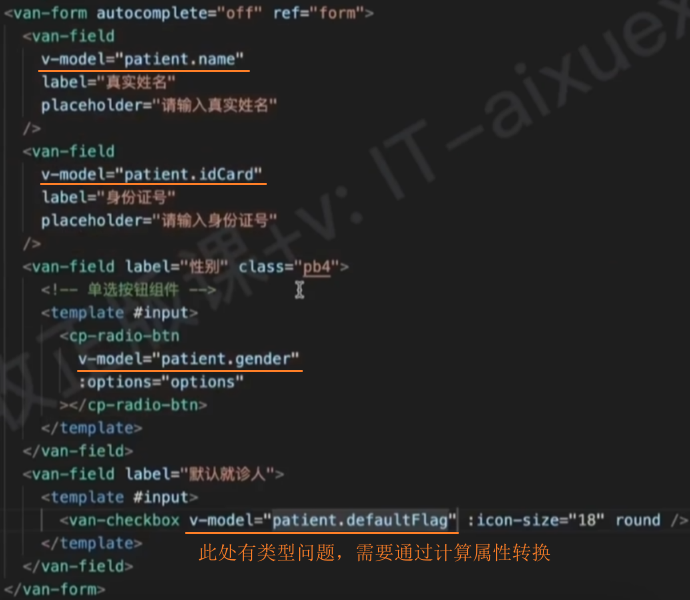
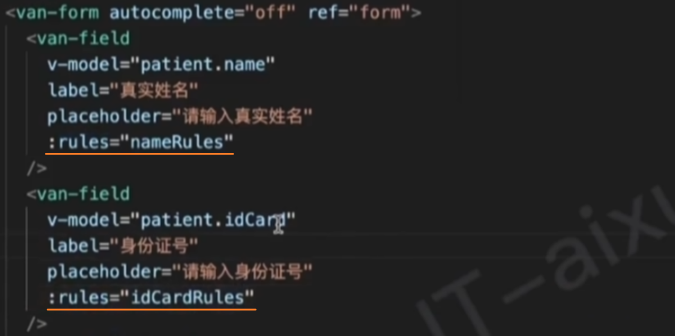
      <van-form autocomplete="off" ref="form">
        <van-field label="真实姓名" placeholder="请输入真实姓名" />
        <van-field label="身份证号" placeholder="请输入身份证号" />
        <van-field label="性别" class="pb4">
          <!-- 单选按钮组件 -->
          <template #input>
            <cp-radio-btn :options="options"></cp-radio-btn>
          </template>
        </van-field>
        <van-field label="默认就诊人">
          <template #input>
            <van-checkbox :icon-size="18" round />
          </template>
        </van-field>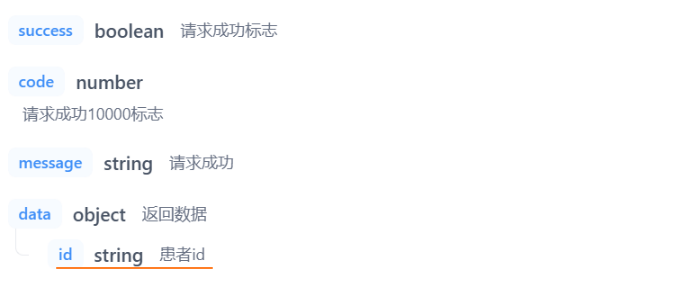
</van-form>接口-添加患者
URL:
/patient/add类型:
POSTtoken:携带
参数:
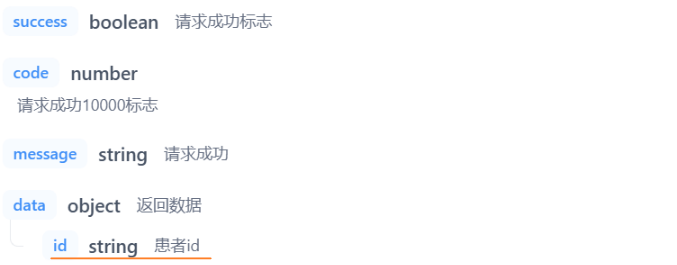
ts{ name: string // 患者姓名 idCard: string // 患者身份证号 defaultFlag: number // 是否设置为默认患者 gender: number // 性别,1:男,0:女 }返回数据:
TS类型修改
问题:patient表单只需要4个属性,而Patient类型有7个属性,因此需要将其他属性修改为可选属性。
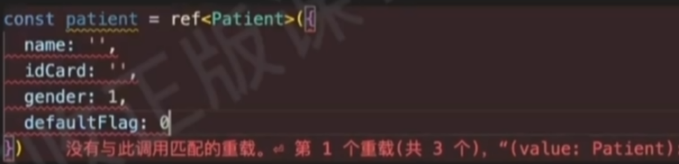
解决:修改Patient类型为可选属性。
渲染表单
功能
重构cp-nav-bar
1、在 cp-nav-bar 组件中定义 back 属性,类型是一个回调函数
2、重构 onClickLeft 方法,如果传入了back,则执行该回调,而不是之前的逻辑
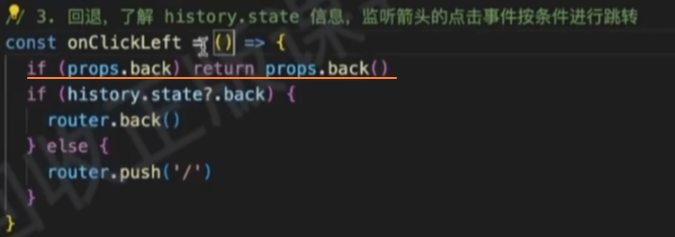
3、在父组件中,传入back属性,实现自定义的关闭弹层逻辑
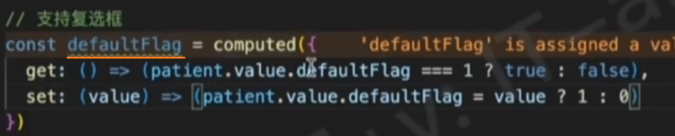
默认就诊人类型转换
问题:默认就诊人给的数据是 0 和 1,而 van-checkbox 值的类型为 true 和 false,需要通过计算属性转换后才能使用。
解决:通过计算属性转换后使用。

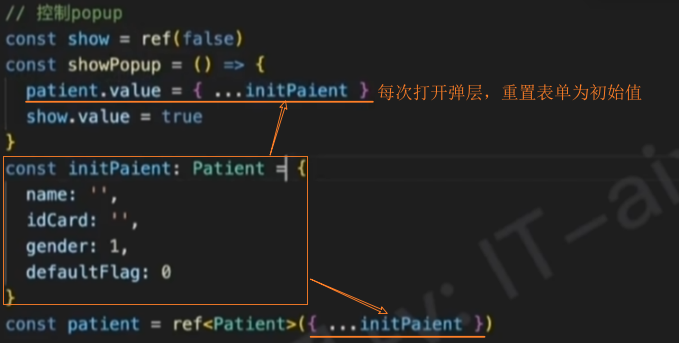
重置表单
需求:每次打开侧滑弹层时,需要将上次弹层中的表单数据清空。
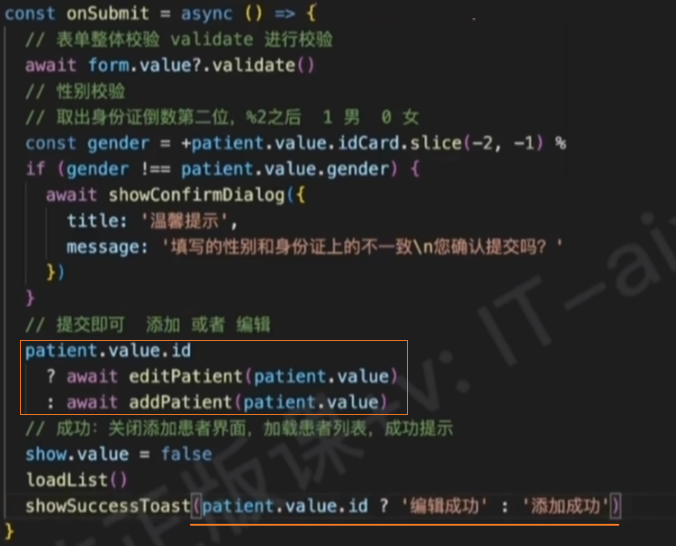
表单校验

1、表单项校验

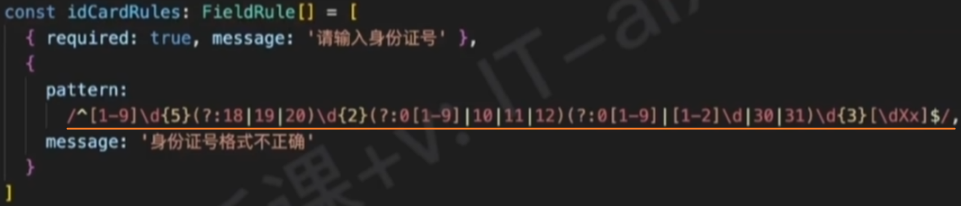
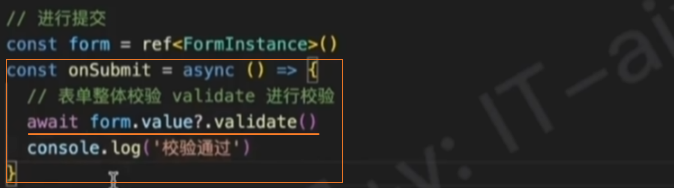
2、提交时校验整个表单
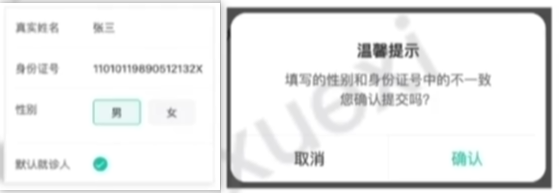
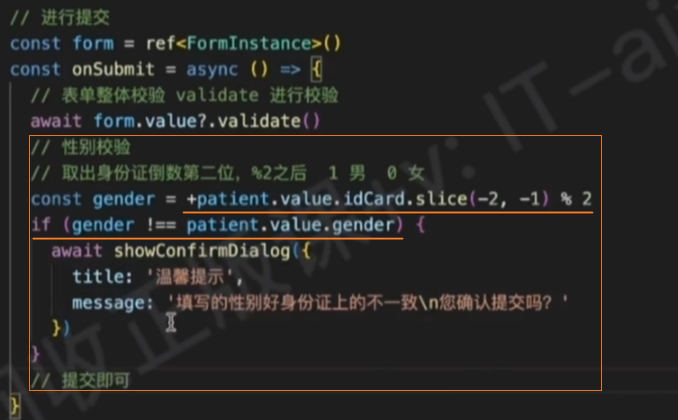
3、性别确认提示
思路:身份证号倒数第二位,如果是偶数就是女,如果是奇数就是男。
实现添加患者

1、在 service/user.ts 中发送网络请求

2、在组件中调用请求方法,实现添加患者
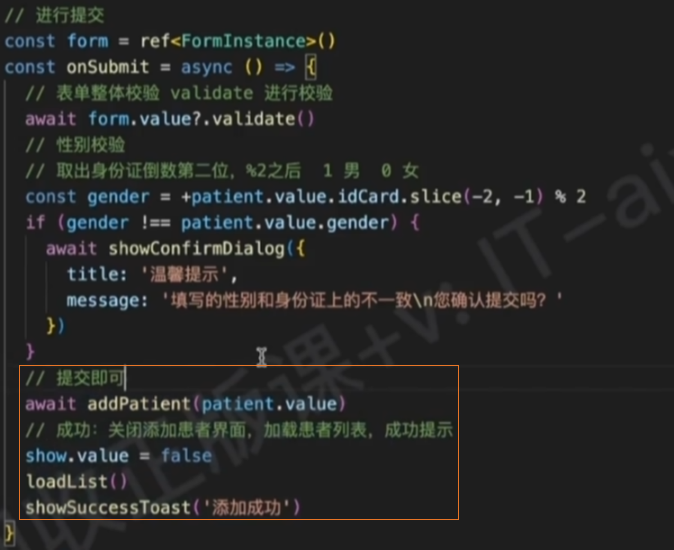
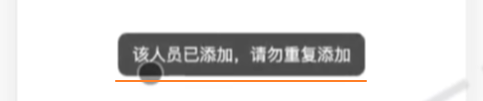
3、注意:如果添加的身份证号已经存在于患者列表中会提示添加失败
编辑患者
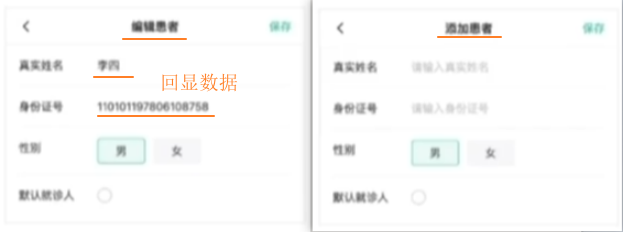
思路:编辑患者和添加患者共用一个组件。

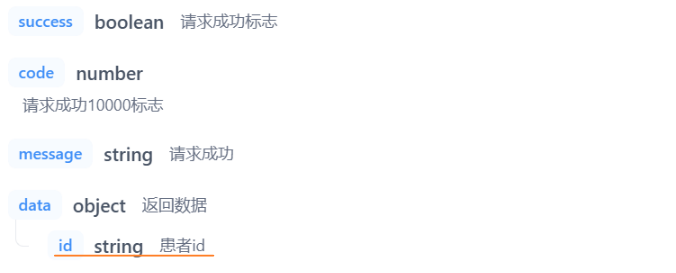
接口
URL:
/patient/update类型:
PUTtoken:携带
参数:
ts{ name: string // 患者姓名 idCard: string // 患者身份证号 defaultFlag: number // 是否设置为默认患者 gender: number // 性别,1:男,0:女 id: string // 患者信息id }返回数据:
功能
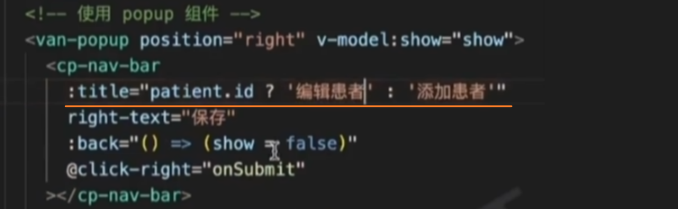
显示弹层
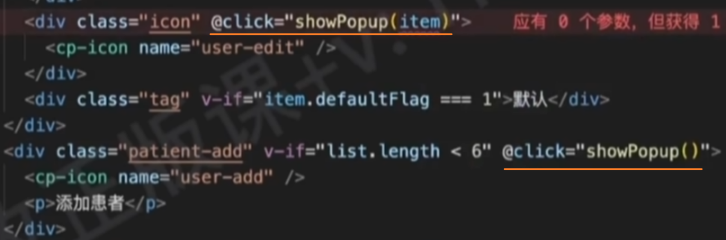
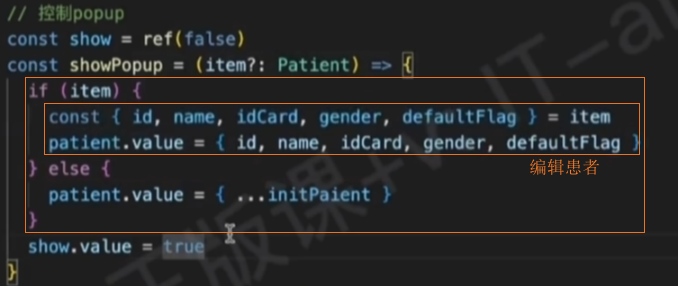
区分标题
思路:根据 patient 对象是否存在id属性,判断是否是编辑状态,显示不同的标题
实现编辑患者
1、在 service/user.ts 中发送网络请求

2、在组件中调用请求方法,将编辑患者逻辑合并到添加患者中
清空校验
需求:当再次打开弹层时,上次的校验结果依然存在,需要清空。

删除患者

接口
URL:
/patient/del/{id}类型:
DELETEtoken:携带
参数:
tsid: string // 患者信息id返回数据:
功能
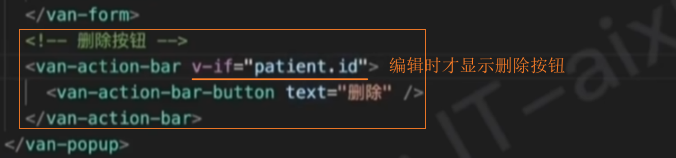
删除按钮
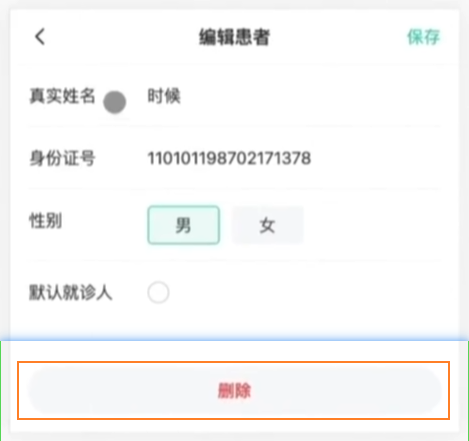
需求:在弹层的底部添加一个删除按钮
修改样式
// 底部操作栏
.van-action-bar {
  padding: 0 10px;
  margin-bottom: 10px;
  .van-button {
    color: var(--cp-price);
    background-color: var(--cp-bg);
  }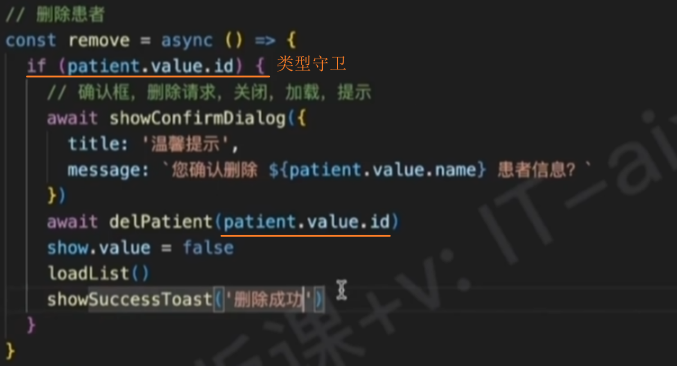
}实现删除患者
1、在 service/user.ts 中发送网络请求

2、在组件中调用请求方法,实现删除患者

Home
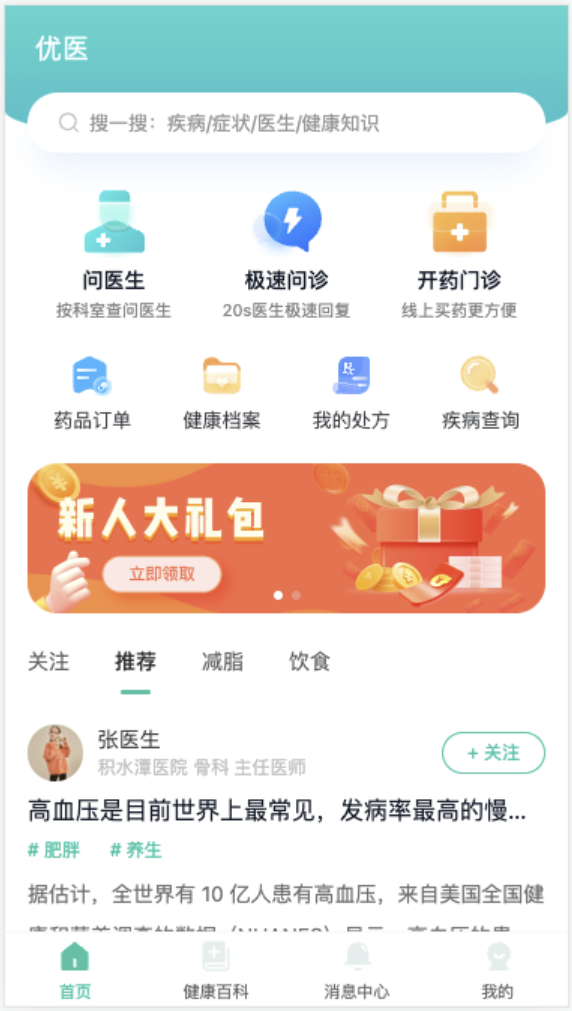
页面布局

1、HTML
<script setup lang="ts"></script>
<template>
<div class="home-page">
<!-- 头部 -->
<div class="home-header">
<div class="con">
<h1>优医</h1>
<div class="search">
<cp-icon name="home-search" /> 搜一搜:疾病/症状/医生/健康知识
</div>
</div>
</div>
<!-- 导航 -->
<div class="home-navs">
<van-row>
<van-col span="8">
<router-link to="/" class="nav">
<cp-icon name="home-doctor"></cp-icon>
<p class="title">问医生</p>
<p class="desc">按科室查问医生</p>
</router-link>
</van-col>
<van-col span="8">
<router-link to="/consult/fast" class="nav">
<cp-icon name="home-graphic"></cp-icon>
<p class="title">极速问诊</p>
<p class="desc">20s医生极速回复</p>
</router-link>
</van-col>
<van-col span="8">
<router-link to="/" class="nav">
<cp-icon name="home-prescribe"></cp-icon>
<p class="title">开药门诊</p>
<p class="desc">线上买药更方便</p>
</router-link>
</van-col>
</van-row>
<van-row>
<van-col span="6">
<router-link to="/" class="nav min">
<cp-icon name="home-order"></cp-icon>
<p class="title">药品订单</p>
</router-link>
</van-col>
<van-col span="6">
<router-link to="/" class="nav min">
<cp-icon name="home-docs"></cp-icon>
<p class="title">健康档案</p>
</router-link>
</van-col>
<van-col span="6">
<router-link to="/" class="nav min">
<cp-icon name="home-rp"></cp-icon>
<p class="title">我的处方</p>
</router-link>
</van-col>
<van-col span="6">
<router-link to="/" class="nav min">
<cp-icon name="home-find"></cp-icon>
<p class="title">疾病查询</p>
</router-link>
</van-col>
</van-row>
</div>
<!-- 轮播图 -->
<div class="home-banner">
<van-swipe indicator-color="#fff">
<van-swipe-item>
<img src="@/assets/ad.png" alt="" />
</van-swipe-item>
<van-swipe-item>
<img src="@/assets/ad.png" alt="" />
</van-swipe-item>
</van-swipe>
</div>
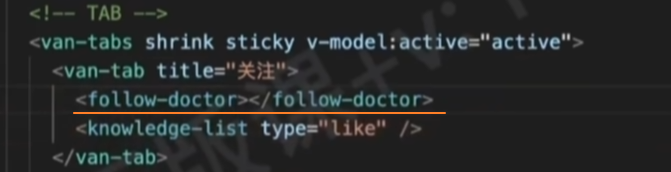
<!-- 知识列表tab -->
<van-tabs shrink sticky v-model:active="active">
<van-tab title="关注">1</van-tab>
<van-tab title="推荐" >
<p v-for="i in 100" :key="i">内容</p>
</van-tab>
<van-tab title="减脂">3</van-tab>
<van-tab title="饮食">4</van-tab>
</van-tabs>
</div>
</template>2、样式
.home-page {
  padding-bottom: 50px;
}
.home-header {
  height: 100px;
  position: relative;
  &::before {
    content: '';
    position: absolute;
    left: 0;
    top: 0;
    width: 100%;
    height: 90px;
    background: linear-gradient(180deg, rgba(62, 206, 197, 0.85), #26bcc6);
    border-bottom-left-radius: 150px 20px;
    border-bottom-right-radius: 150px 20px;
  }
  .con {
    position: relative;
    padding: 0 15px;
    > h1 {
      font-size: 18px;
      color: #fff;
      font-weight: normal;
      padding: 20px 0;
      line-height: 1;
      padding-left: 5px;
    }
    .search {
      height: 40px;
      border-radius: 20px;
      box-shadow: 0px 15px 22px -7px rgba(224, 236, 250, 0.8);
      background-color: #fff;
      display: flex;
      align-items: center;
      padding: 0 20px;
      color: var(--cp-dark);
      font-size: 13px;
      .cp-icon {
        font-size: 16px;
        margin-right: 5px;
      }
    }
  }
}
.home-navs {
  padding: 10px 15px 0 15px;
  .nav {
    display: flex;
    flex-direction: column;
    align-items: center;
    padding: 10px 0;
    .cp-icon {
      font-size: 48px;
    }
    .title {
      font-weight: 500;
      margin-top: 5px;
      color: var(--cp-text1);
    }
    .desc {
      font-size: 11px;
      color: var(--cp-tag);
      margin-top: 2px;
    }
    &.min {
      .cp-icon {
        font-size: 31px;
      }
      .title {
        font-size: 13px;
        color: var(--cp-text2);
        font-weight: normal;
      }
    }
  }
}
.home-banner {
  padding: 10px 15px;
  height: 100px;
  img {
    width: 100%;
    height: 100%;
  }
}3、全局覆盖van-tab样式
// 全局覆盖van-tab样式
.van-tabs {
  .van-tabs__nav {
    padding: 0 0 15px 0;
  }
  .van-tabs__line {
    width: 20px;
    background-color: var(--cp-primary);
  }
  .van-tab {
    padding: 0 15px;
  }
}组件:knowledge-card
页面布局
1、HTML
<template>
    <div class="knowledge-card van-hairline--bottom">
      <div class="head">
        <van-image
          round
          class="avatar"
          src="https://yanxuan-item.nosdn.127.net/9ad83e8d9670b10a19b30596327cfd14.png"
        ></van-image>
        <div class="info">
          <p class="name">张医生</p>
          <p class="dep van-ellipsis">积水潭医院 骨科 主任医师</p>
        </div>
        <van-button class="btn" size="small" round>+ 关注</van-button>
      </div>
      <div class="body">
        <h3 class="title van-ellipsis">高血压是目前世界上最常见,发病率最高的慢性病之一</h3>
        <p class="tag">
          <span># 肥胖</span>
          <span># 养生</span>
        </p>
        <p class="intro van-multi-ellipsis--l2">
          据估计,全世界有 10
          亿人患有高血压,来自美国全国健康和营养调查的数据(NHANES)显示,高血压的患病率呈逐年上升趋势。
          但是,我国高血压的控制程度非常不乐观,不少朋友担心降压药对肾的影响,有些甚至因为担心伤肾,而不敢吃降压药。
          我们就介绍一下,高血压对肾脏的危害,还有降压药对肾脏影响。
          没有耐心看的朋友,可以直接记住这个结论:高血压比降压药伤肾。千万不要因为担心副作用不敢吃药,那是「丢西瓜捡芝麻」得不偿失的行为
        </p>
        <div class="imgs">
          <van-image
            src="https://yanxuan-item.nosdn.127.net/c1cdf62c5908659a9e4c8c2f9df218fd.png"
          />
          <van-image
            src="https://yanxuan-item.nosdn.127.net/c1cdf62c5908659a9e4c8c2f9df218fd.png"
          />
          <van-image
            src="https://yanxuan-item.nosdn.127.net/c1cdf62c5908659a9e4c8c2f9df218fd.png"
          />
        </div>
        <p class="logs">
          <span>10 收藏</span>
          <span>50 评论</span>
        </p>
      </div>
    </div>
</template>2、样式
.knowledge-card {
  padding: 20px 0 16px;
  .head {
    display: flex;
    align-items: center;
    .avatar {
      width: 38px;
      height: 38px;
      margin-right: 10px;
    }
    .info {
      width: 200px;
      padding-right: 10px;
      .name {
        color: var(--cp-text2);
      }
      .dep {
        color: var(--cp-tip);
        font-size: 12px;
      }
    }
    .btn {
      padding: 0 12px;
      border-color: var(--cp-primary);
      color: var(--cp-primary);
      height: 28px;
      width: 72px;
    }
  }
  .body {
    .title {
      font-size: 16px;
      margin-top: 8px;
      font-weight: normal;
    }
    .tag {
      margin-top: 6px;
      > span {
        color: var(--cp-primary);
        margin-right: 20px;
        font-size: 12px;
      }
    }
    .intro {
      margin-top: 7px;
      line-height: 2;
      color: var(--cp-text3);
    }
    .imgs {
      margin-top: 7px;
      display: flex;
      .van-image {
        width: 106px;
        height: 106px;
        margin-right: 12px;
        border-radius: 12px;
        overflow: hidden;
        &:last-child {
          margin-right: 0;
        }
      }
      &.large {
        .van-image {
          width: 185px;
          height: 125px;
        }
      }
    }
    .logs {
      margin-top: 10px;
      > span {
        color: var(--cp-tip);
        margin-right: 16px;
        font-size: 12px;
      }
    }
  }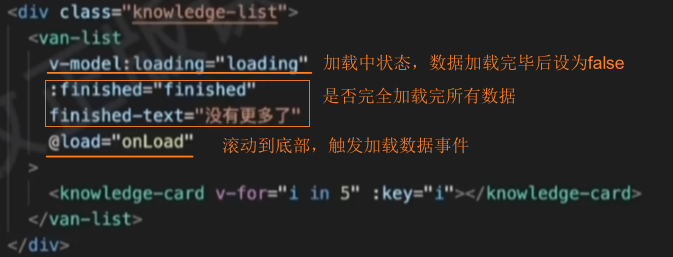
}组件:knowledge-list
页面布局
1、HTML
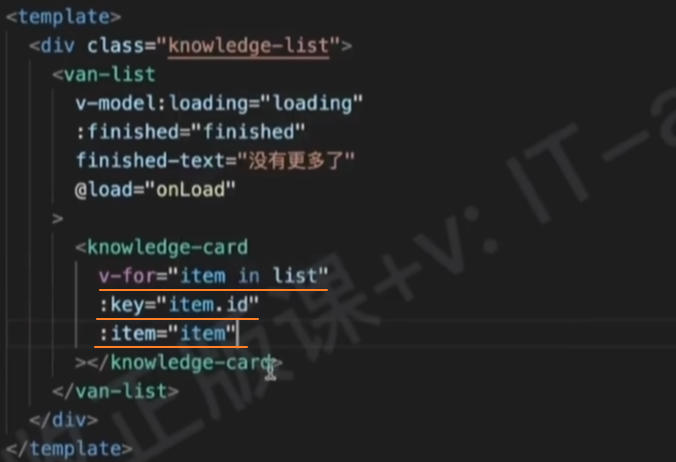
<template>
  <div class="knowledge-list">
    <knowledge-card v-for="i in 5" :key="i"></knowledge-card>
  </div>
</template>2、样式
.knowledge-list {
  padding: 0 15px;
}3、在Home组件中使用 knowlege-list
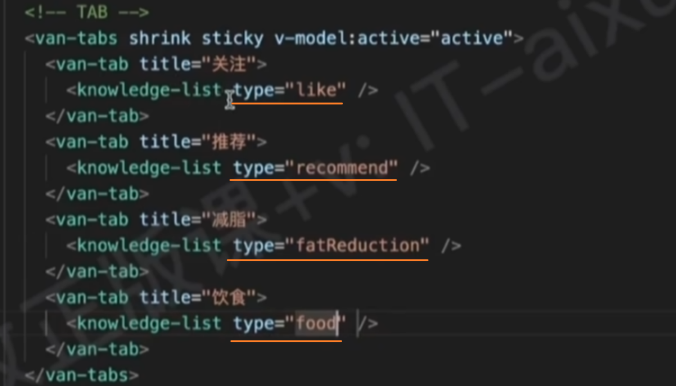
    <van-tabs shrink sticky v-model:active="active">
      <van-tab title="关注"><knowledge-list /></van-tab>
      <van-tab title="推荐"><knowledge-list /></van-tab>
      <van-tab title="减脂"><knowledge-list /></van-tab>
      <van-tab title="饮食"><knowledge-list /></van-tab>
</van-tabs>功能
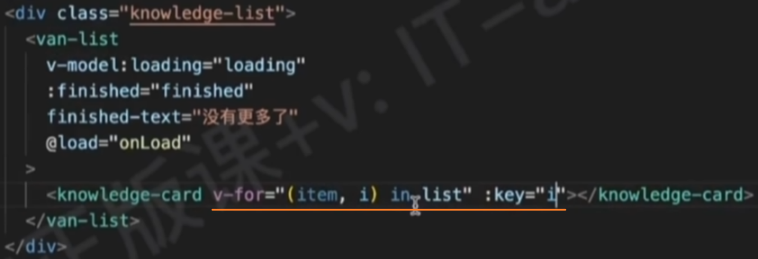
列表加载更多

1、使用 van-list 实现列表加载更多功能
2、模拟加载后台数据
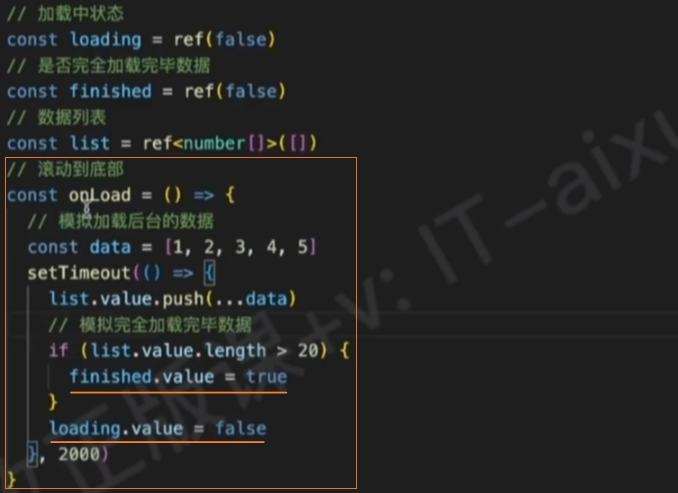
3、遍历加载的数据
渲染请求数据

TS类型
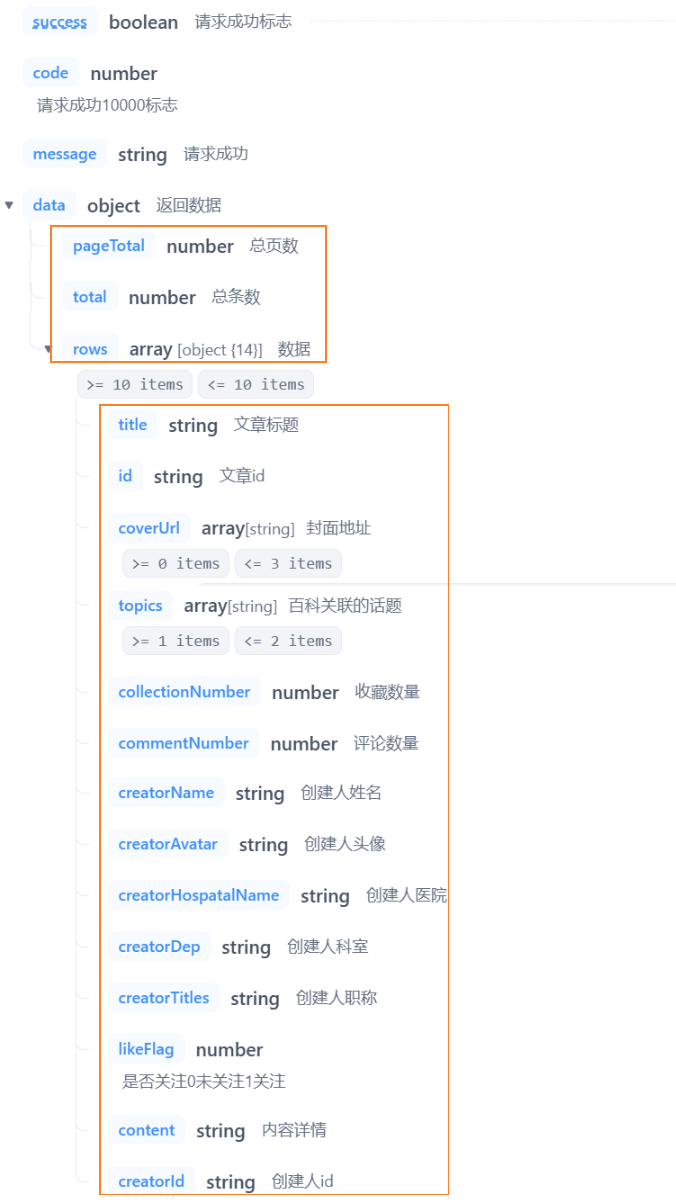
1、响应数据类型
// 文章信息类型
export type Knowledge = {
  id: string
  /** 标题 */
  title: string
  /** 封面[] */
  coverUrl: string[]
  /** 标签[] */
  topics: string[]
  /** 收藏数 */
  collectionNumber: number
  /** 评论数 */
  commentNumber: number
  /** 医生名称 */
  creatorName: string
  /** 医生头像 */
  creatorAvatar: string
  /** 医生医院 */
  creatorHospatalName: string
  /** 关注文章 */
  likeFlag: 0 | 1
  /** 内容 */
  content: string
  /** 医生科室 */
  creatorDep: string
  /** 医生职称 */
  creatorTitles: string
  /** 医生ID */
  creatorId: string
}

// 文章列表
export type KnowledgeList = Knowledge[]

// 文章列表带分页
export type KnowledgePage = {
  pageTotal: number
  total: number
  rows: KnowledgeList
}2、查询参数类型
// props类型 recommend推荐,fatReduction减脂,food健康饮食,like关注医生页面文章
export type KnowledgeType = 'like' | 'recommend' | 'fatReduction' | 'food'

// 文章列表查询参数
export type KnowledgeParams = {
  type: KnowledgeType
  current: number
  pageSize: number
}知识列表类型
1、在 kownlege-list 组件中,定义props类型
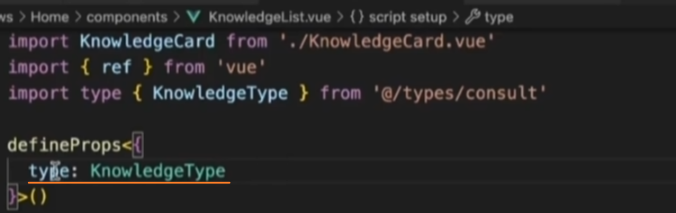
2、在使用组件时添加type属性
接口
URL:
/patient/home/knowledge类型:
GETtoken:携带
参数:
ts{ type: KnowledgeType // recommend: 推荐,fatReduction: 减脂,food: 健康饮食,like: 关注医生页面文章 current: number pageSize: number }返回数据:
渲染数据

1、在 services/home.ts 中发送网络请求

2、在组件中调用请求方法,获取知识列表数据
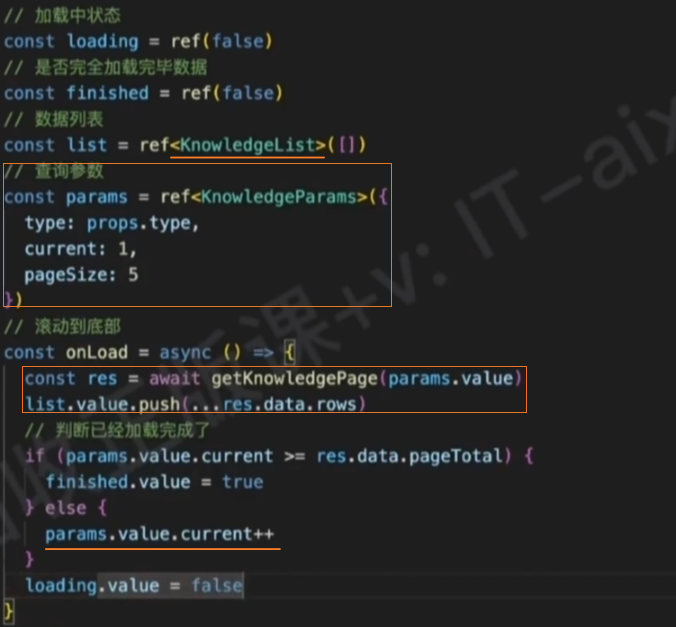
3、遍历并传递数据到 kownlege-card 中
4、渲染数据到 kownlege-card 中

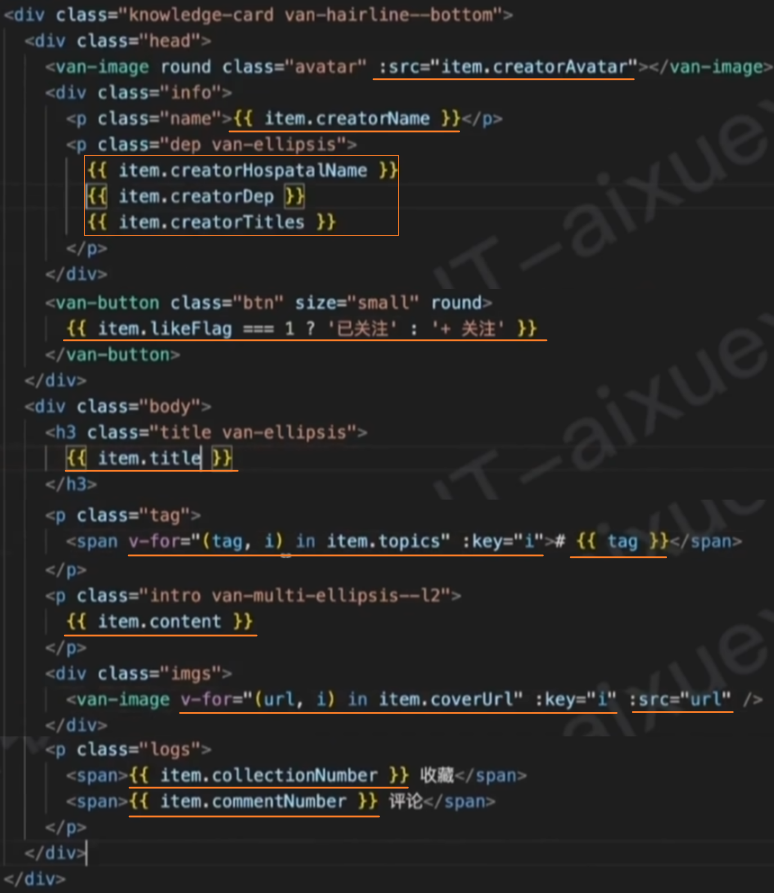
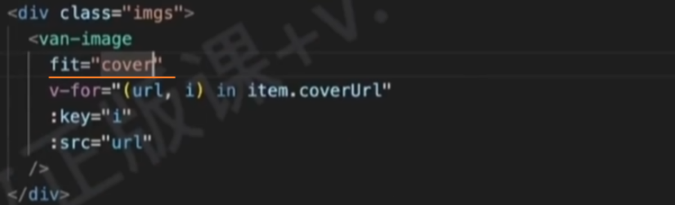
5、修复:图片变形

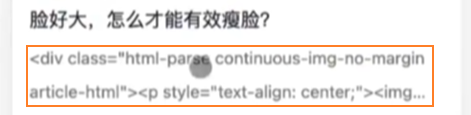
6、修复:去除HTML代码

7、修复:一张配图展示
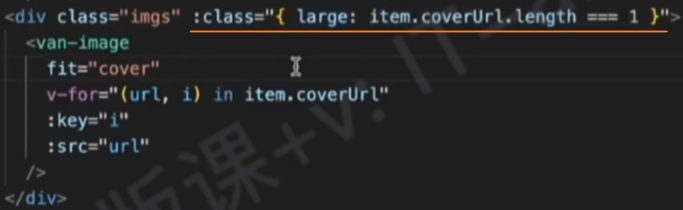
组件:doctor-card
页面布局
1、HTML
<template>
  <div class="doctor-card">
    <van-image
      round
      src="https://yanxuan-item.nosdn.127.net/3cb61b3fd4761555e56c4a5f19d1b4b1.png"
    />
    <p class="name">周医生</p>
    <p class="van-ellipsis">积水潭医院 神经内科</p>
    <p>副主任医师</p>
    <van-button round size="small" type="primary">+ 关注</van-button>
  </div>
</template>2、样式
.doctor-card {
width: 135px;
height: 190px;
background: #fff;
border-radius: 20px;
box-shadow: 0px 0px 11px 0px rgba(229, 229, 229, 0.2);
text-align: center;
padding: 15px;
margin-left: 15px;
display: inline-block;
box-sizing: border-box;
> .van-image {
width: 58px;
height: 58px;
vertical-align: top;
border-radius: 50%;
margin: 0 auto 8px;
}
> p {
margin-bottom: 0;
font-size: 11px;
color: var(--cp-tip);
&.name {
font-size: 13px;
color: var(--cp-text1);
margin-bottom: 5px;
}
}
> .van-button {
padding: 0 12px;
height: 28px;
margin-top: 8px;
width: 72px;
}
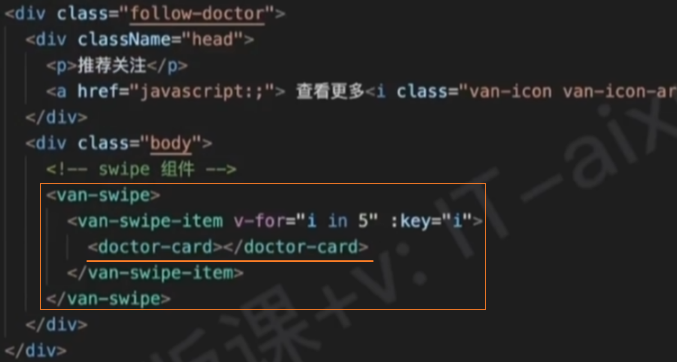
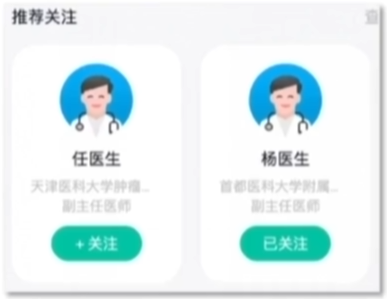
}组件:follow-doctor
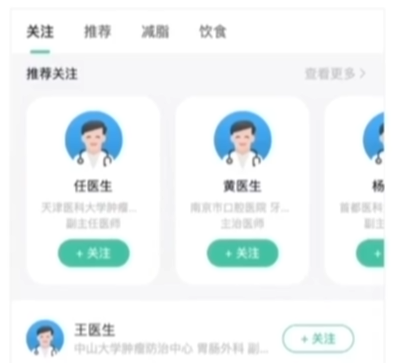

页面布局
1、使用组件
1、HTML
<template>
  <div class="follow-doctor">
    <div className="head">
      <p>推荐关注</p>
      <a href="javascript:;"> 查看更多<i class="van-icon van-icon-arrow" /></a>
    </div>
    <div class="body">
      <!-- swipe 组件 -->
    </div>
  </div>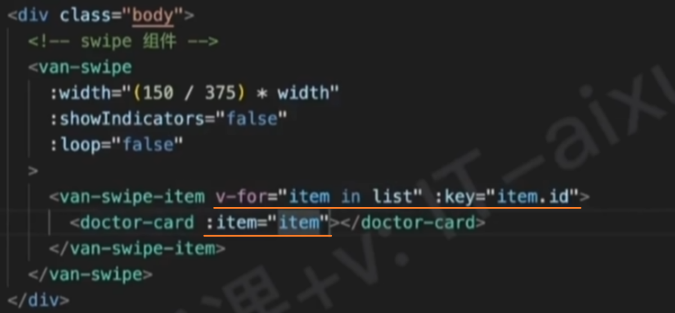
</template>2、使用 van-swipe 组件遍历包裹 doctor-card 组件
3、样式
.follow-doctor {
  background-color: var(--cp-bg);
  height: 250px;
  .head {
    display: flex;
    justify-content: space-between;
    height: 45px;
    align-items: center;
    padding: 0 15px;
    font-size: 13px;
    > a {
      color: var(--cp-tip);
    }
  }
  .body {
    width: 100%;
    overflow: hidden;
  }
}渲染请求数据

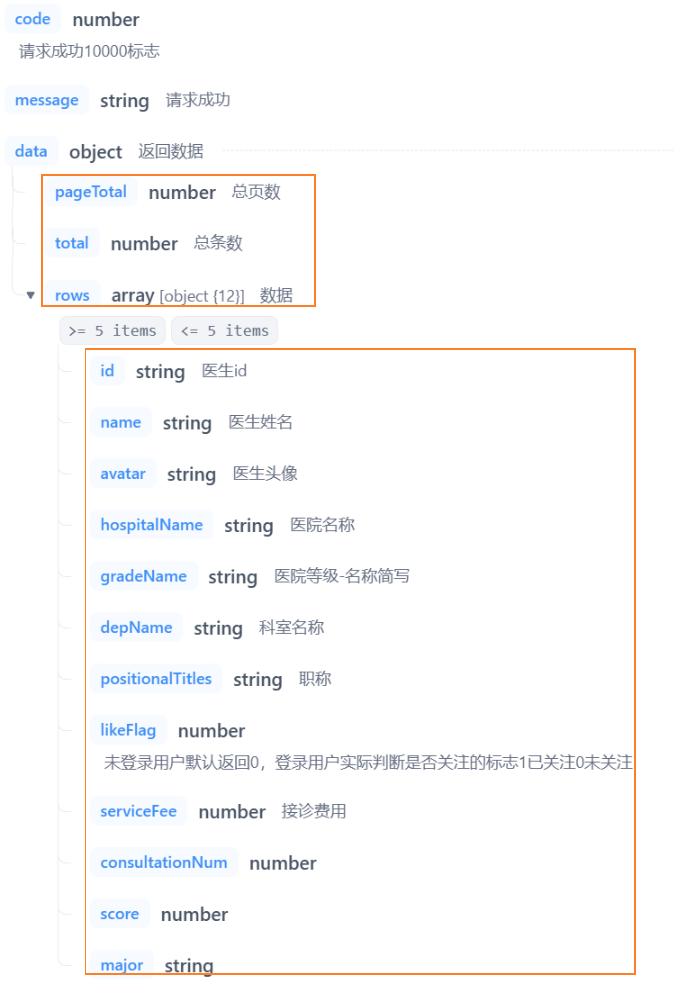
TS类型
// 医生卡片对象
export type Doctor = {
  /** 医生ID */
  id: string
  /** 医生名称 */
  name: string
  /** 头像 */
  avatar: string
  /** 医院名称 */
  hospitalName: string
  /** 医院等级 */
  gradeName: string
  /** 科室 */
  depName: string
  /** 职称 */
  positionalTitles: string
  /** 是否关注,0 未关注 1 已关注 */
  likeFlag: 0 | 1
  /** 接诊服务费 */
  serviceFee: number
  /** 接诊人数 */
  consultationNum: number
  /** 评分 */
  score: number
  /** 主攻方向 */
  major: string
}接口
URL:
/home/page/doc类型:
GETtoken:携带
参数:
ts{ current: number pageSize: number }返回数据:
渲染数据
1、在 services/home.ts 中发送网络请求

2、在组件中调用请求方法,获取医生列表数据
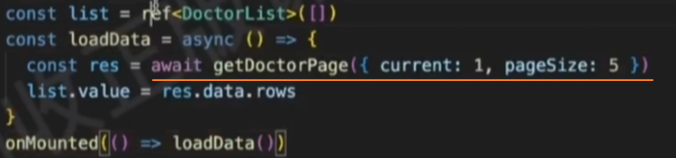
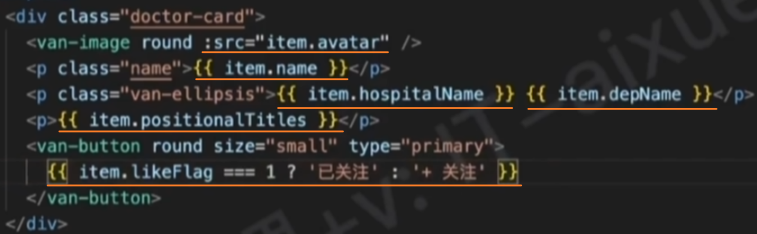
3、遍历并传递数据到 doctor-card 中
4、渲染数据到 doctor-card 中

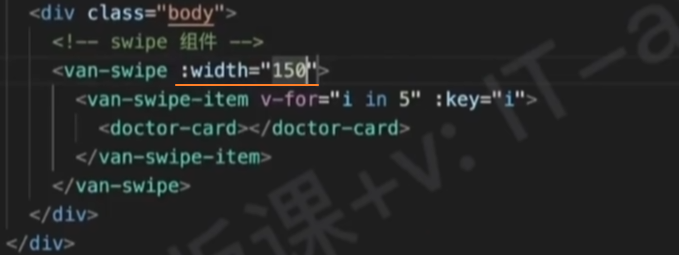
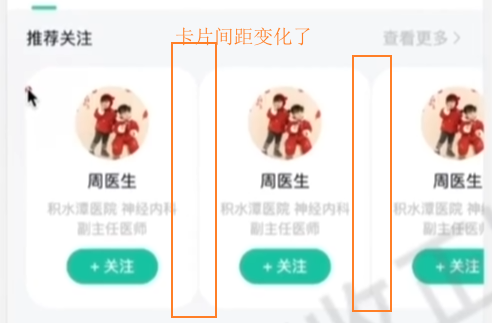
功能
调整卡片间距
需求:需要调整 van-swipe-item 宽度,让卡片更加紧凑
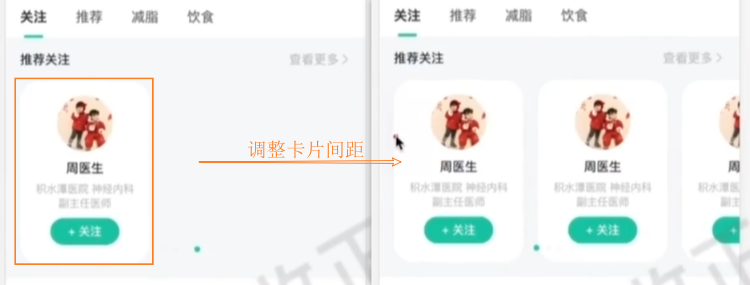
实现:
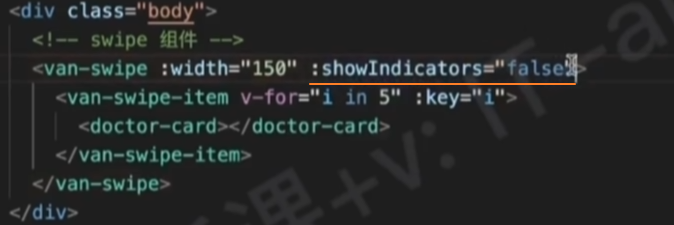
清除无限滚动

清除指示器
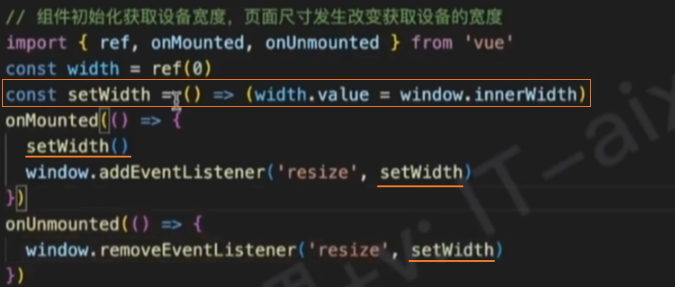
适配滑动宽度@

依赖包:vueuse
安装:
pnpm i @vueuse/core宽度公式: 375 / 150 = 设备宽度 / x,设备宽度可以通过 useWindowSize() 响应式获取。
实现:
1、通过 vueuse 的 useWindowSize() 方法响应式获取设备宽度

2、响应式设置 van-swipe 的宽度
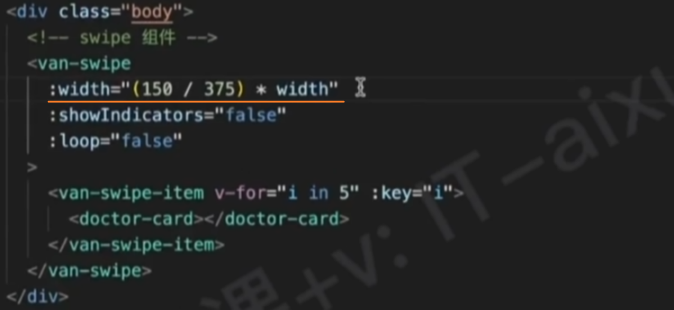
扩展:使用原生的方式实现
关注医生

接口
URL:
/like类型:
POSTtoken:携带
参数:
ts{ type: string // topic: 百科话题, knowledge: 百科文章, doc: 医生, disease: 疾病 id: string // 对应的id }返回数据:
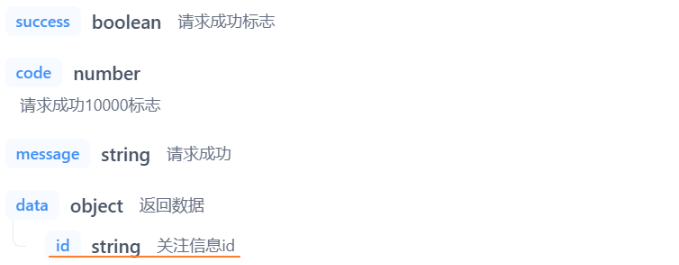
TS类型

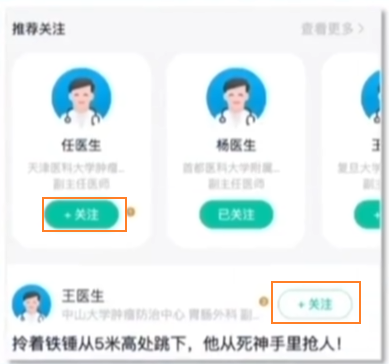
实现关注
1、在 services/home.ts 中发送网络请求

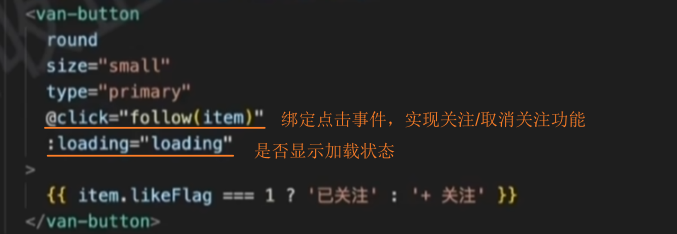
2、在组件中,当点击关注/取消关注按钮时,调用请求方法实现关注/取消关注功能
关注文章
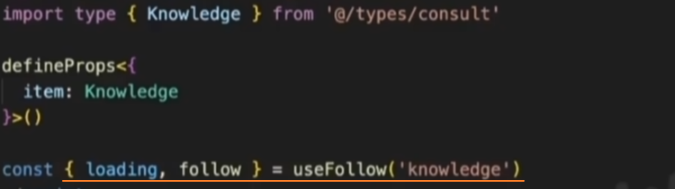
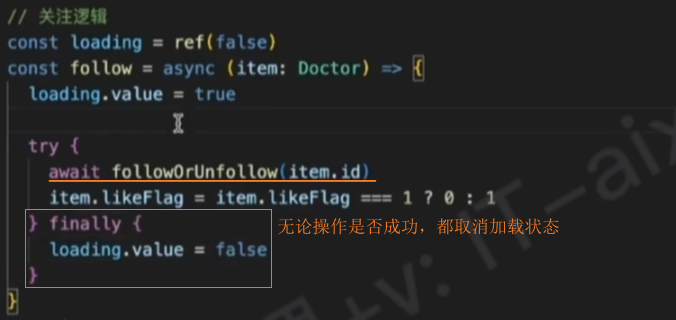
封装关注逻辑@

1、将关注逻辑封装到 hooks/index.ts 中
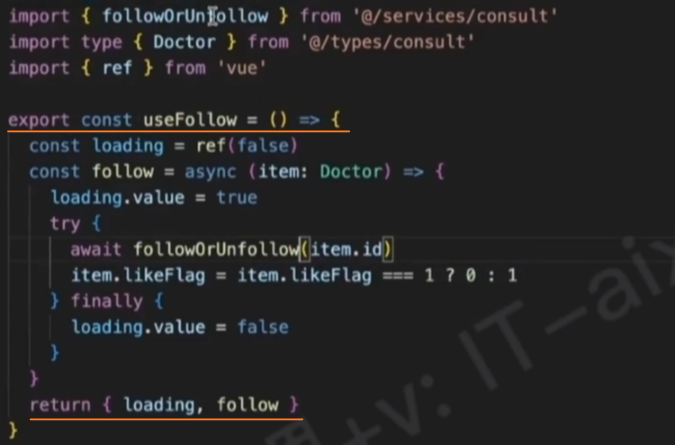
2、在 doctor-card 组件中导入并使用封装的hook

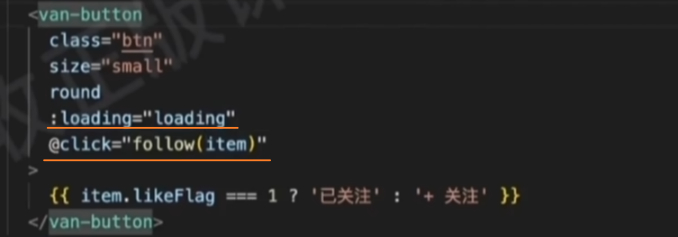
实现关注文章
1、修改封装的 useFollow() 方法,添加type参数,修改item类型
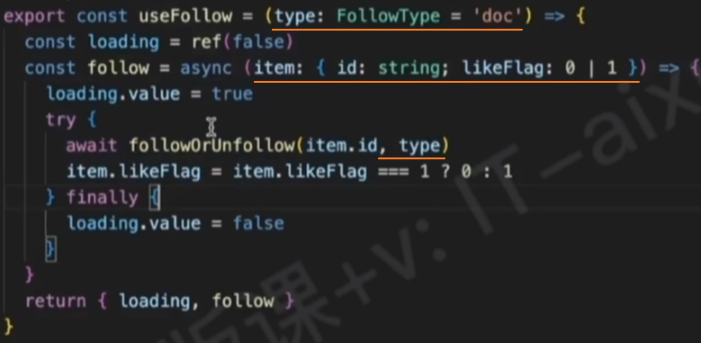
2、在 knowledge-card 组件中,使用 useFollow() 方法,实现关注文章